Tampilkan postingan dengan label social media. Tampilkan semua postingan

Rabu, 03 Desember 2014

Facebook Popup Like Box Widget For Blogger

Facebook has become the leading social media service on the Internet playing host to over 1.3 billion users; of those, 800 million login to their dashboard feeds at least once a day. Thanks to the vast number of active users on services like Facebook, acquiring new readers as a blogger or content provider has become easier than ever.

In order to produce an effective digital campaign, you absolutely must take advantage of social media by doing things like integrating Facebook on Blogger. Email marketing can be useful, but it comes with restrictions that could limit your blog's potential. Perhaps the most significant problem is that emails don't come with a face or personality like Facebook does.

Think of a time when you received an email in you inbox from someone you didn't know. Where you inclined to open it or did you send it right to the junk folder? If it's your first introduction to new consumer, they simply don't know who you are, what you want, and how you got their email. This sets off an initial breakdown of any type of trust that might have developed. The reputation of email marketing is further deteriorated with a study done by Kaspersky Lab, an Internet research firm. They estimate that around 70% of all the emails sent in the world are spam.

Sharing site content using a Facebook Like Box is just one of many strategies that can generate a regular flow of traffic from a diverse demographic that might have been previously inaccessible. Adding a Facebook Like Box to your site helps to reduces your individual workload, and instead distributes that ability equally among your readers.

When someone reads your content and appreciates the kind of work that you produce, they'll be willing to share that information to their followers and fans, setting off a viral reaction. The first step necessary to making this a reality is to make this change to your site. These next few steps will provide you with a quick and easy guide on how to add a 'Like Box' to your Blogger site so that you can began taking advantage of these great opportunities.


Click here for a DEMO


How to Add the Facebook Popup Like Box Widget

1. Log into your Blogger account and select your blog > go to 'Layout' & click the 'Add a Gadget' link on the right side
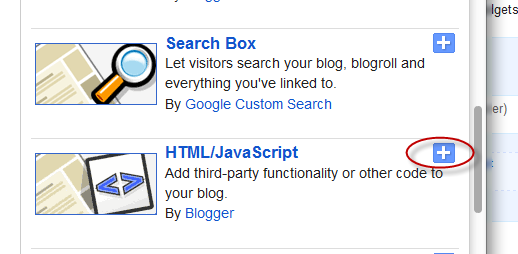
2. Once the popup window is open, select the HTML/JavaScript gadget from the list:


3. Copy and paste the following code inside the empty box:
<script src='http://ajax.googleapis.com/ajax/libs/jquery/1.7.2/jquery.min.js' type='text/javascript'></script>
<style>
#fbox-background {
    display: none;
    background: rgba(0,0,0,0.8);
    width: 100%;
    height: 100%;
    position: fixed;
    top: 0;
    left: 0;
    z-index: 99999;
}

#fbox-close {
    width: 100%;
    height: 100%;
}

#fbox-display {
    background: #eaeaea;
    border: 5px solid #828282;
    width: 340px;
    height: 230px;
    position: absolute;
    top: 32%;
    left: 37%;
    -webkit-border-radius: 5px;
    -moz-border-radius: 5px;
    border-radius: 5px;
}

#fbox-button {
    float: right;
    cursor: pointer;
    position: absolute;
    right: 0px;
    top: 0px;
}

#fbox-button:before {
    content: "CLOSE";
    padding: 5px 8px;
    background: #828282;
    color: #eaeaea;
    font-weight: bold;
    font-size: 10px;
    font-family: Tahoma;
}

#fbox-link,#fbox-link a.visited,#fbox-link a,#fbox-link a:hover {
    color: #aaaaaa;
    font-size: 9px;
    text-decoration: none;
    text-align: center;
    padding: 5px;
}
</style>
<script type='text/javascript'>
//<![CDATA[
jQuery.cookie = function (key, value, options) {
// key and at least value given, set cookie...
if (arguments.length > 1 && String(value) !== "[object Object]") {
options = jQuery.extend({}, options);
if (value === null || value === undefined) {
options.expires = -1;
}
if (typeof options.expires === 'number') {
var days = options.expires, t = options.expires = new Date();
t.setDate(t.getDate() + days);
}
value = String(value);
return (document.cookie = [
encodeURIComponent(key), '=',
options.raw ? value : encodeURIComponent(value),
options.expires ? '; expires=' + options.expires.toUTCString() : '', // use expires attribute, max-age is not supported by IE
options.path ? '; path=' + options.path : '',
options.domain ? '; domain=' + options.domain : '',
options.secure ? '; secure' : ''
].join(''));
}
// key and possibly options given, get cookie...
options = value || {};
var result, decode = options.raw ? function (s) { return s; } : decodeURIComponent;
return (result = new RegExp('(?:^|; )' + encodeURIComponent(key) + '=([^;]*)').exec(document.cookie)) ? decode(result[1]) : null;
};
//]]>
</script>
<script type='text/javascript'>
jQuery(document).ready(function($){
if($.cookie('popup_facebook_box') != 'yes'){
$('#fbox-background').delay(5000).fadeIn('medium');
$('#fbox-button, #fbox-close').click(function(){
$('#fbox-background').stop().fadeOut('medium');
});
}
$.cookie('popup_facebook_box', 'yes', { path: '/', expires: 7 });
});
</script>
<div id='fbox-background'>
<div id='fbox-close'>
</div>
<div id='fbox-display'>
<div id='fbox-button'>
</div>
<iframe allowtransparency='true' frameborder='0' scrolling='no' src='//www.facebook.com/plugins/likebox.php?
href=https://www.facebook.com/pages/Helplogger/120574614736021&width=402&height=255&colorscheme=light&show_faces=true&show_border=false&stream=false&header=false'
style='border: none; overflow: hidden; background: #fff; width: 339px; height: 200px;'></iframe>
<div id="fbox-link">Powered by <a style="padding-left: 0px;" href="http://helplogger.blogspot.com" rel="nofollow">Helplogger</a></div>
</div>
</div>
4. Press the 'Save' button to add the widget to your blog. That's it!

Customization

  • After adding the code, replace the address in blue https://www.facebook.com/pages/Helplogger/120574614736021 with your site's facebook page URL.

  • The widget will appear 5 seconds after the page finishes loading. If you want to change this delay, change the number 5000 to a greater or lesser number in this part:
.delay(5000)
  • By default, the like box only shows up the first time the user visits your page.  If you would like the Facebook box to popup every time the page loads, then remove this line of code:
$.cookie('popup_facebook_box', 'yes', { path: '/', expires: 7 });
  • If you want to display only when user visits your homepage, go to 'Template' > hit the 'Edit HTML' button on the right side and search by clicking anywhere inside the code area and pressing the CTRL + F keys for this tag:
</body>
Paste the facebook popup widget right above the body tag and make sure to include the conditional tags below:
&lt;b:if cond='data:page.type == "index"'&gt;ADD THE FACEBOOK WIDGET CODE HERE &lt;/b:if&gt;
After saving your work, you can test out your new feature by returning to one of your old posts which should bring up a little popup widget asking if you'd like to join the site's facebook page.

If you don't see the Facebook Like Box on the page, you may need to delete your cookies or check out the 'Customization' section above in order to display the widget every time a user visits your site. Once this widget is added to your site, all your hard work should start to translate into an increase in web traffic and number of Facebook fans.

Selasa, 25 Februari 2014

Share Blog Posts in Social Media using AddThis

In my opinion, AddThis is the most complete social sharing service allowing to share your posts in more than 270 different social networks. I use the AddThis widget, so if you would like to see a live demo, please scroll down to the bottom of this post to see the AddThis sharing buttons.


This tutorial will show you how to register and add this feature on your blog and you will get to know some of the customization options of these buttons. So let's get started!

Getting the AddThis share buttons code

Step 1. Visit the https://www.addthis.com/get/sharing page.
Step 2. To get the sharing buttons and to access the AddThis sharing stats to find out how many people shared your post by using the AddThis feature, click on the "Create account" button.

create addthis account

The site will ask you to make a small registration. Fill out the information to register. It's quick, simple and it's free. To finish the registration, click on the Register button.

register addthis

Step 3. After you've been logged in, right below the "Get sharing buttons for", choose the "A website" option.

addthis share buttons

Step 4. In the "Select style" section, choose the buttons style that you think would look the best on your site/blog. Please note that on the right side you can see a preview of these buttons.

addthis sharing buttons

Step 5. After you have chosen the style, the site will provide a code - click on the "Grab it" button to copy it.

addthis code

The code provided will look like this:
<!-- AddThis Button BEGIN -->
<div class="addthis_toolbox addthis_default_style ">
<a class="addthis_button_facebook_like" fb:like:layout="button_count"></a>
<a class="addthis_button_tweet"></a>
<a class="addthis_button_pinterest_pinit" pi:pinit:layout="horizontal"></a>
<a class="addthis_counter addthis_pill_style"></a>
</div>
<script type="text/javascript">var addthis_config = {"data_track_addressbar":true};</script>
<script type="text/javascript" src="//s7.addthis.com/js/300/addthis_widget.js#pubid=ra-XXXXXXXXXXX"></script>
<!-- AddThis Button END -->
Now that you have selected and set up your AddThis sharing buttons, let's add them in the footer of the posts.

Adding the AddThis sharing buttons on Blogger

Step 1. Access your Blogger Dashboard and go to Template, then click on the Edit HTML button on the right:

blogger template

Step 2. Click anywhere inside the code area and press the CTRL + F keys to open the search box.

Step 3. Type the following line inside the search box and try to find the second occurrence of it - hit Enter:
<div class='post-footer'>
Step 4. Just above this line, add the code for the AddThis social sharing buttons.

Note: If you want to add at the beginning of your posts, add the code below the second:
<div class='post-header'>

How to add more AddThis buttons

To add more buttons, simply choose the button for that social network and add the code just before the </div> tag (refer to the step 5 from above).

Some examples:
<a class="addthis_button_linkedin"></a> /* linkedin button */
<a class="addthis_button_google_plusone" g:plusone:size="medium"></a> /*gplus button */
<a class="addthis_button_digg"></a> /* digg button */
<a class="addthis_button_stumbleupon"></a> /* stumbleupon button */
<a class="addthis_button_print"></a> /* print button */

CSS3 AddThis Share Buttons

You can add just a single button, so that when the reader hovers over it, a menu will open with the options of social networks to share the post.

css3 share buttons, addthis

Visit this page for a demo.

Step 1. Go to Template > click on the Edit HTML button > press the CTRL + F keys and search:
<div class='post-footer'>
Just above this line, paste the following code:
<style type='text/css'>
.addthis_share_btn a, .addthis_share_btn a:visited {
background: #FF5C00; /* background color of the button */
display: inline-block;
padding: 6px 12px;
font-family: arial,helvetica,lucida,verdana,sans-serif;
font-size: 12px;
line-height: 1em;
color: #fff;
text-decoration: none;
-moz-border-radius: 5px;
-webkit-border-radius: 5px;
-moz-box-shadow: 0 1px 3px rgba(0,0,0,0.5);
-webkit-box-shadow: 0 1px 3px rgba(0,0,0,0.5);
border-radius: 5px;
box-shadow: 0 1px 3px rgba(0,0,0,0.5);
text-shadow: 0 -1px 1px rgba(0,0,0,0.25);
border-bottom: 1px solid rgba(0,0,0,0.25);
position: relative;
cursor: pointer;
}
.addthis_share_btn a:hover {
background: #D45500; /* background color on mouse hover */
color: #fff;
}
.addthis_share_btn a:active { top: 1px; }

.addthis_share_btn a span, .addthis_share_btn:visited a span {
background: url(http://www.addthis.com/cms-content/images/gallery/icon-addthis.gif) no-repeat left;
padding: 1px 0 1px 18px;
}
</style>
<!-- AddThis Share Button -->
<div class='addthis_toolbox addthis_share_btn'>
<a class='addthis_button_compact' href='http://addthis.com/bookmark.php'>
<span>Share</span></a>
</div>
<script src='http://s7.addthis.com/js/250/addthis_widget.js' type='text/javascript'/>
<!-- End AddThis Share Button -->

Customization

- To change the color of the button according to the colors of your template, modify the color value in red.
- If you want to change the "Share" text, replace the text in blue.

Step 2. Save the changes by clicking on the Save template button and you're done!

Kamis, 20 Februari 2014

Add floating social media sharing buttons below Blogger post titles

It is becoming increasingly important to make our posts appreciated and shared on social networks and one of the best ways to get traffic to our blog/website and boost sharing stats is to add social sharing buttons.

In this tutorial we will see how to add a floating social media sharing bar below the title of Blogger posts, so when a reader scrolls down the page, he will still be able to see the sharing buttons without having to scroll back to the top.
Adding the below jQuery script will make the buttons float in a fixed position as soon as they reach "the top" of the page. By scrolling back, the buttons will return to their initial position.

The social sharing bar includes buttons for Facebook, Twitter, Google+, and Pinterest.

Social Media Sharing Buttons below Blogger Post Title


Step 1. From the Blogger Dashboard, go to Template and click on the Edit HTML button:


Step 2. Click anywhere inside the code area and press the CTRL + F keys to open the search box. Type the </head> tag inside the search box and hit Enter to find it.

blogger search box, ctrl + f

Step 3. Just above </head> add this script:
<script src='http://ajax.googleapis.com/ajax/libs/jquery/1.7.1/jquery.min.js' type='text/javascript'/>

<script type='text/javascript'>
//<![CDATA[
$(function() {
var $movesbuttons = $("#floating-social-buttons"),
$window = $(window),
offset = $movesbuttons.offset();
$window.scroll(function() {
if ($window.scrollTop() > offset.top) {
$movesbuttons.css({'position' : 'fixed', 'width' : '550px', 'top' : '0px'});
} else {
$movesbuttons.css({'position' : 'absolute', 'top' : 'auto'});
}
});
});
//]]>
</script>
Step 4. Now before ]]></b:skin> add the following CSS styles:
#floating-social-buttons {
padding: 6px 0px 12px;
position: absolute;
background: #F6F6F6;
border-bottom: 1px solid #DEDEDE;
width: 550px;
height: 18px;
z-index: 99;
}
.floating-social-buttons {
margin-left: 5px !important;
}
.floating-social-buttons li {
float: left;
margin-left: 5px;
list-style:none;
}
To change the width of the bar, modify the 550px values in red. Note that this value also appears in the script which also needs to be modified.

Step 5. Finally, just below the second <div class='post-header'> (press CTRL + F and hit Enter twice to find the second one) add the following code:
<b:if cond='data:blog.pageType == &quot;item&quot;'>
<div style='padding:5px 0 35px 0;clear:both;'>
<div id='floating-social-buttons'>
<ul class='floating-social-buttons'>

<li><iframe allowTransparency='true' expr:src='&quot;http://www.facebook.com/plugins/like.php?href=&quot; + data:post.url+ &quot;&amp;layout=button_count&amp;show_faces=false&amp;width=100&amp;height=25&amp;action=like&amp;font=tahoma&amp;colorscheme=light&quot;' frameborder='0' scrolling='no' style='border:none; overflow:hidden; width:100px; height:25px;'/></li>

<li><a class='twitter-share-button' data-lang='en' href='https://twitter.com/share'>Tweet</a><script src='//platform.twitter.com/widgets.js' type='text/javascript'/></li>

<li><script src='http://apis.google.com/js/plusone.js' type='text/javascript'/><g:plusone expr:href='data:post.url' size='medium'/></li>

<li><a class='pin-it-button' count-layout='horizontal' expr:href='&quot;http://pinterest.com/pin/create/button/?url=&quot; + data:post.url + &quot;&amp;media=&quot; + data:post.thumbnailUrl + &quot;&amp;description=&quot; + data:post.snippet' style='margin:0 10px 5px 0;'>Pin It</a> <script src='http://assets.pinterest.com/js/pinit.js' type='text/javascript'/></li>

</ul>
</div>
</div>
</b:if>
Customization:

If you want the buttons appear at the end of the post, paste this code before or after <div class='post-footer'>
If the bar overlaps with the post content, then change 35px to a higher value.

Step 6. Click on the Save template button... and that's it!

So these were the steps for adding the horizontal social buttons bar on Blogger. I highly recommend using this bar as it could really help you to get more social traffic for your blog.

Senin, 17 Februari 2014

Add A CSS Animated Share Button on Blogger

I saw this on Paulund, a highly recommended site with a good collection of snippets, i.e., a collection of different codes that develop small utilities, all of these being applicable to web design.

In this tutorial we will see how we can add as similar button with a really cool hover effect and four social media icons on Blogger with links to share the current page on Facebook, Twitter, Google+ and Pinterest. However, we can replace these social networks later with any other just by changing the links below.

Demo

Creating A CSS Animated Share Button


Step 1. From your Blogger dashboard > go to Template > click on the Edit HTML button.

Step 2. Click anywhere inside the code area and press the Ctrl + F keys to open the blogger search box. Type or paste the ]]></b:skin> tag and hit Enter to find it. Step 3. Just above ]]></b:skin> add this CSS:
.share_button {
width: 300px;
height: 50px;
margin: 10px auto;
}
.share_button ul {
width: 50%;
height: inherit;
float: left;
list-style: none;
margin: 0 !important;
padding: 0 !important;
}
.share_button ul h1 {
margin-top: 9%;
overflow: hidden;
width: 100%;
color: #4889F0;
font-size: 18px;
text-shadow:2px 2px 2px #fff;
}
.share_button ul li {
position: absolute;
height: inherit;
width: 150px;
margin: 0 !important;
padding: 0 !important;
background: #EEEEEE;
-webkit-transition: all 600ms;
-moz-transition: all 600ms;
-o-transition: all 600ms;
-ms-transition: all 600ms;
transition: all 600ms;
text-align: center;
}
.share_button ul li h2 {
display: inline-block;
width: 32%;
height: 40px;
overflow: hidden;
margin-top: 5%;
cursor: pointer;
border: 0 !important;
}
.share_button ul:first-child li:first-child{
text-align: right;
}
.share_button ul:last-child li:first-child{
text-align: left;
}
.share_button ul:first-child li:last-child,
.share_button:hover ul:first-child li:first-child {
-webkit-transform: rotateY(90deg);
-moz-transform: rotateY(90deg);
-o-transform: rotateY(90deg);
-ms-transform: rotateY(90deg);
transform: rotateY(90deg);
}
.share_button ul:last-child li:last-child,
.share_button:hover ul:last-child li:first-child {
-webkit-transform: rotateY(-90deg);
-moz-transform: rotateY(-90deg);
-o-transform: rotateY(-90deg);
-ms-transform: rotateY(-90deg);
transform: rotateY(-90deg);
}
.share_button:hover ul:first-child li:last-child,
.share_button:hover ul:last-child li:last-child {
-webkit-transform: rotateY(0deg);
-moz-transform: rotateY(0deg);
-o-transform: rotateY(0deg);
-ms-transform: rotateY(0deg);
transform: rotateY(0deg);
}

Step 5. And now let's go ahead and insert the HTML button in the template. The most common place would be just after <div class='post-footer'> - find the second <div class='post-footer'> and paste the following code just above it:
<div class='share_button'>

<ul>
<li><h1>
Share t
</h1></li>

<li><h2>
<a expr:href='&quot;http://www.facebook.com/sharer.php?u=&quot; + data:post.canonicalUrl + &quot;&amp;t=&quot; + data:post.title ' title='Share on Facebook'><img src="https://blogger.googleusercontent.com/img/b/R29vZ2xl/AVvXsEhQTRyHUFJ8m_6ajfHFknz8fmRjRJZvr6dh1oRrObi3-YrKZFmmAyW5jDoUn6dLL8-nmD8r34m0TefGYPRyvFk5l2n9j5vO9dynH_0vEXu7q80N_sAASpzbMjPC-6b1UtO0QjmqspftVlJN/s1600/Facebook.png"/></a></h2>

<h2><a expr:href='&quot;http://twitter.com/home?status=&quot; + data:post.title + &quot; &quot; + data:post.canonicalUrl ' title='Share on Twitter'><img src="https://blogger.googleusercontent.com/img/b/R29vZ2xl/AVvXsEgr-Qr3vrr9eHxRqjIic7Nry-Zk1wmPeaUgnpFPj0PvCVoQSr8pjvTxAZA5zEsFrOrN3JUkGLG13s3bnz58hDNhZ6IRzXvdPA1hS98_EBCXYHdCna6gLik0IYTGuHXf2uwOEem9iVfgObZz/s1600/Twitter.png"/></a></h2>
</li>
</ul>
<ul>
<li><h1>his page</h1></li>

<li>
<h2><a expr:href='&quot;https://plus.google.com/share?url=&quot; + data:post.canonicalUrl ' title='Share on Google Plus'><img src="https://blogger.googleusercontent.com/img/b/R29vZ2xl/AVvXsEhrkwPWMWO9zjAXVpc1mjQ9ScgfxK_W766o9ZievnAmqp3RIbyv250PesLv8gKZbcMrt0nTzF-TBnyQhm9S-I5-SQkMes4r8B6mX6LJoKT0_K5oHPUouPPoYkW1N8Q9ALz_T0aO6vQFP5cf/s1600/Google-plus.png"/></a></h2>

<h2>
<a href='javascript:void((function(){var%20e=document.createElement(&apos;script&apos;);e.setAttribute(&apos;type&apos;,&apos;text/javascript&apos;);e.setAttribute(&apos;charset&apos;,&apos;UTF-8&apos;);e.setAttribute(&apos;src&apos;,&apos;http://assets.pinterest.com/js/pinmarklet.js?r=&apos;+Math.random()*99999999);document.body.appendChild(e)})());' title='Share on Pinterest'><img src="https://blogger.googleusercontent.com/img/b/R29vZ2xl/AVvXsEjWvfzAWpB05zmUci2eSo58aRe3xZcoLS6K_ydboSaIdxn_2CNAc8Tnzj9TMwgS4B9V1ae4ATtnUvtuRiAQ1WI04QGpV21H8UrnvG_l7yNMve6TgHiG2cd30D9kfSgIRDJo00-depVhfpJX/s1600/Pinterest.png"/></a>
</h2>
</li>
</ul>

</div>
Note: if you want to change the icons, replace the URLs in blue.

Step 5. Click on the Save template button and we're done! Enjoy ;)

Sabtu, 15 Februari 2014

jQuery Sliding Panel with Expanding/Collapsing Content for Blogger

Many times when we think about making a blog, we want to put many gadgets, although many are not necessary, or perhaps only a few of them. But to add the gadgets that we want, we need to have enough space. A solution would be using an expanding/collapsing menu that is hidden and expands when the user clicks on it.

Originally, this plugin called Sliding Login Panel was created so that users could register on the site, but as we know, in Blogger we don't have the option to add a user registration, however, that doesn't mean that we can't take advantage of this plugin and use it to add other elements, such as a menu, search box, social icons, feed subscription etc.
You can find a demo of this panel in this blog - just click on the Open menu link on the top.

Adding the jQuery Expand/Collapse Slider Panel to Blogger

This sliding menu is made with jQuery, so the first thing is to add the script by pasting it just below the <head> tag:

Step 1. From your Blogger dashboard > go to Template > click on the Edit HTML button:

blogger template

Step 2. Click anywhere inside the code area and search by pressin the CTRL + F keys for the <head> tag

Step 3. Below the <head> tag, add this script:
<script src='http://ajax.googleapis.com/ajax/libs/jquery/1.4.2/jquery.min.js' type='text/javascript'></script>
<script type='text/javascript'>
$(document).ready(function() {

$(&quot;#open&quot;).click(function(){
$(&quot;div#panel&quot;).slideDown(&quot;slow&quot;);
});

$(&quot;#close&quot;).click(function(){
$(&quot;div#panel&quot;).slideUp(&quot;slow&quot;);
});

$(&quot;#toggle a&quot;).click(function () {
$(&quot;#toggle a&quot;).toggle();
});

});</script>

<b:if cond='data:blog.pageType != &quot;item&quot;'>
<style>
body#layout #slide-top-panel {display:none !important;}
</style>
</b:if>

Step 4. Now search (CTRL + F) the </head> tag and add the CSS styles just above it:
<style>
.clearfix:after {content: ".";display: block;height: 0;clear: both;visibility: hidden;}
.clearfix {display: inline-block;}
* html .clearfix {height: 1%;}
.clearfix {display: block;}
.clearfix {height: 1%;}
.clearfix {display: block;}

.tab {
background: url(https://blogger.googleusercontent.com/img/b/R29vZ2xl/AVvXsEh6EYeRHhIP5-ebSlsDXgsoxJ2g35vGQHzIJ_TuScqcxsL22hlMslBcodlnMVYVm3MDckgoZYYpQB9hXEuHFKDj2FsLgrOLNcD1nCziIRMeGmDJyRWgZafiDTzW-V9tKxAITP86jEvn1wkb/s1600/sliding-panel-tab-0.png) repeat-x 0 0;
height: 42px;
position: relative;
top: 0;
z-index: 999;
}
.tab ul.login {
display: block;
position: relative;
float: right;
clear: right;
height: 42px;
width: auto;
font-weight: bold;
line-height: 42px;
margin: 0;
right: 150px;
color: white;
font-size: 80%;
text-align: center;
}
.tab ul.login li.left {
background: url(https://blogger.googleusercontent.com/img/b/R29vZ2xl/AVvXsEjwsGZ9IN17R-G43sIqQBmxafOY83u8klhBXQKS7cbLsU-dnzGj_hnS-f1u3yCX5lNbBMsHGJ96SKMdIWGL94PllvhPi0AsbwF4zi-WglOv0CPv_3U8TI4k70ZVhLmMzJko7FUHqAfqL9Yw/s1600/sliding-panel-tab-left.png) no-repeat left 0;
height: 42px;
width: 30px;
padding: 0;
margin: 0;
display: block;
float: left;
}
.tab ul.login li.right {
background: url(https://blogger.googleusercontent.com/img/b/R29vZ2xl/AVvXsEhcb5l6oO8Dpv9_2lEVGfA5_8hV2e7r0zc-RbT4XpP5vY_67_pQ3zYmzbfzEiq-I7QFAerV7GMXmzFnwwVAQnvgBku8RNsqaoGYJ25gmVtKR1ya9Ru-o_YhrHTe23NaF5Ib2BllhMrYFsH-/s1600/sliding-panel-tab-right.png) no-repeat left 0;
height: 42px;
width: 30px;
padding: 0;
margin: 0;
display: block;
float: left;
}
.tab ul.login li {
text-align: left;
padding: 0 6px;
display: block;
float: left;
height: 42px;
background: url(https://blogger.googleusercontent.com/img/b/R29vZ2xl/AVvXsEhgeCW44Chq20YXoe1D3bEDM_KrOVHkCEu3VU6hBy-ujkzRbFmccvwP2LW62kxKh3jg8_gGGFAIgXuj9asj4DHpC0kMpmpbvTQ6RwrFIUuyjzx_KgqfKOf_y8ZPz2Z2x2rxKvX-XivuHvoq/s1600/sliding-panel-tab.png) repeat-x 0 0;
}

.tab ul.login li a {color: #15ADFF;}
.tab ul.login li a:hover {color: #FFFFFF;}
.tab .sep {color:#414141}

.tab a.open, .tab a.close {
height: 20px;
line-height: 20px !important;
padding-left: 30px !important;
cursor: pointer;
display: block;
width: 100px;
position: relative;
top: 11px;
}

.tab a.open {background: url(https://blogger.googleusercontent.com/img/b/R29vZ2xl/AVvXsEiL4CTEQqSS6uxDLyGm2wIsP7TfGkuaJV1jUYfopNN9F-eusDjD8oRFqL892ML3tw7o_XKCLDyK2_VtT136l1tHCqNRSbL0nD7qMEbvwcmju2-29GQVNUBU4vM7rSf3MF2jEatUSBAojbk3/s1600/button-open.png) no-repeat left 0;}
.tab a.close {background: url(https://blogger.googleusercontent.com/img/b/R29vZ2xl/AVvXsEj1L9w0CG99YW7kWOugymesoXJGyGQXZZ3FtLyYIdTGV-3m8SB1Xzen0PuBn6Edq0Q0ktAVX-cIqQbhcBcym1WDRPDVZjPyYlEMkdiu9jQOZb1DusLlGpMvpj4CUnM7IRkPaDon6jnq2uiq/s1600/button-close.png) no-repeat left 0;}
.tab a:hover.open {background: url(https://blogger.googleusercontent.com/img/b/R29vZ2xl/AVvXsEiL4CTEQqSS6uxDLyGm2wIsP7TfGkuaJV1jUYfopNN9F-eusDjD8oRFqL892ML3tw7o_XKCLDyK2_VtT136l1tHCqNRSbL0nD7qMEbvwcmju2-29GQVNUBU4vM7rSf3MF2jEatUSBAojbk3/s1600/button-open.png) no-repeat left -19px;}
.tab a:hover.close {background: url(https://blogger.googleusercontent.com/img/b/R29vZ2xl/AVvXsEj1L9w0CG99YW7kWOugymesoXJGyGQXZZ3FtLyYIdTGV-3m8SB1Xzen0PuBn6Edq0Q0ktAVX-cIqQbhcBcym1WDRPDVZjPyYlEMkdiu9jQOZb1DusLlGpMvpj4CUnM7IRkPaDon6jnq2uiq/s1600/button-close.png) no-repeat left -19px;}

#slide-top-panel {
position: absolute;
top: 0;
width: 100%;
z-index: 999;
text-align: center;
margin-left: auto;
margin-right: auto;
}
#panel {
width: 100%;
height: 230px;
color: #999999;
background: #272727;
overflow: hidden;
position: relative;
z-index: 3;
display: none;
}
#panel h4 {
font-size: 18px;
color: #F2F2F2;
text-align: center;
padding: 5px 0 10px;
margin: 0;
}
#panel p {
margin: 5px 0;
padding: 0px;
}
#panel a {
text-decoration: none;
color: #15ADFF;
}
#panel a:hover {
color: white;
}
#panel .content {
width: 960px;
margin: 0 auto;
padding-top: 15px;
text-align: left;
font-size: 0.85em;
}
#panel .content .left {
width: 280px;
float: left;
padding: 0 15px;
border-left: 1px solid #333;
}
#panel .content .right {
border-right: 1px solid #333;
}
#panel .content form {
margin: 0 0 10px 0;
}
#panel .content label {
float: left;
padding-top: 8px;
clear: both;
width: 280px;
display: block;
}
#panel .content input.field {
border: 1px #1A1A1A solid;
background: #545454;
border-radius: 10px;
margin-right: 5px;
margin-top: 4px;
width: 200px;
color: white;
height: 18px;
}
#panel .content input:focus.field {
background: #7F7F7F;
}
#panel .content input.button-register {
display: block;
clear: both;
height: 24px;
width: 94px;
color: white;
background: transparent url(https://blogger.googleusercontent.com/img/b/R29vZ2xl/AVvXsEi8kuBiwwkIjHKqFdGu7OU8BJ0doOfRh-Z4A-DHEntk7q9mPTFjw_M3iUiLm-hGZWgEaBF0MNL7WhxChPUxvIKZWVmFujr_iiTDxwx2dsXaVuv8knXYgn4SyUDPhKrpIjrCnUcWi8sUIG8T/s1600/button-register.png) no-repeat 0 0;
text-align: center;
cursor: pointer;
border: none;
font-weight: bold;
margin: 10px auto;
}
#sliding-panel {
width: 160px;
float: left;
}
#sliding-panel2 {
width: 160px;
float: right;
}
#sliding-panel ul, #sliding-panel2 ul{
font-family: Arial, Helvetica, sans-serif;
list-style-type:none;
margin:0;
padding:0;
}
#sliding-panel ul li a, #sliding-panel2 ul li a {
background:url(https://blogger.googleusercontent.com/img/b/R29vZ2xl/AVvXsEifLViK-qrM-LiSBRwzsWwmFpgBOEoZtazAp42hGGOA9YLuwEO5VDZxn2Lwa9ZFrN6JKW6350uLwULZjiF5qSUi0TReS94ducbqTin81kb9DXtL_3uprjyufW_r9YJ5jqNTiwSJndUvsyij/s1600/star-bullet.png) center left no-repeat;
margin:0;
padding:3px 3px 3px 18px;
}
#sliding-panel li, #sliding-panel2 li {
display: inline;
}
#sliding-panel a, #sliding-panel2 a{
color: #999999;
text-decoration: none;
font-size: 11px;
display: block;
padding: 3px;
width: 160px;
}
#sliding-panel a:link, #sliding-panel a:visited, #sliding-panel2 a:link, #sliding-panel2 a:visited {
color: #999999;
text-decoration: none;
}
#sliding-panel a:hover, #sliding-panel2 a:hover {
color: #FFFFFF;
}

#search-box22{
margin-top: 20px;
}

#search-box22 input[type="text"] {
float: right;
background: 10px 6px #444;
border: 0 none;
font: bold 12px Arial,Helvetica,Sans-serif;
color: #777;
width: 160px;
padding: 6px 15px 6px 35px;
-webkit-border-radius: 20px;
-moz-border-radius: 20px;
border-radius: 20px;
text-shadow: 0 2px 2px rgba(0, 0, 0, 0.3);
-webkit-box-shadow: 0 1px 0 rgba(255, 255, 255, 0.1), 0 1px 3px rgba(0, 0, 0, 0.2) inset;
-moz-box-shadow: 0 1px 0 rgba(255, 255, 255, 0.1), 0 1px 3px rgba(0, 0, 0, 0.2) inset;
box-shadow: 0 1px 0 rgba(255, 255, 255, 0.1), 0 1px 3px rgba(0, 0, 0, 0.2) inset;
-webkit-transition: all 0.7s ease 0s;
-moz-transition: all 0.7s ease 0s;
-o-transition: all 0.7s ease 0s;
transition: all 0.7s ease 0s;
}

#search-box22 input[type="text"]:focus {
width: 190px;
}

.about-author {
width: 100%;
text-transform: none;
margin-top: 15px;
}
.authorbox {
overflow: hidden;
padding: 0;
width: 100%;
}
.authorbox .authorinfo {
}
.authorbox .authorinfo img {
float: left;
margin: 4px 10px 4px 5px;
border-radius: 100%;
width: 20%;
background: #222;
padding: 5px;
}
.authorbox .authorinfo p {
margin: 0;
padding: 0 5px;
text-align: left;
}
.authorinfo p a {
text-decoration:none;
}
.authorbox h3 {
margin: 0;
display: inline-block;
}
h3.boxtitle {
font-size: 14px;
}
</style>
Note:
- in case you need more space for your widgets, the height of the entire container can be changed by modifying the 230px value from height: 230px;
- To change the background color, change this color value: #272727

Step 5. And finally, we will place the HTML structure of it - right after the <body> tag, add this code:
<!-- Start sliding panel -->
<div id='slide-top-panel'>
<div id='panel'>
<div class='content clearfix'>

<!-- first section -->
<div class='left' style='width:240px !important'>

<h4>Welcome to my blog!</h4>
<div class='about-author'>
<div class='authorbox'>
  <div class='authorinfo'>
<img src='https://blogger.googleusercontent.com/img/b/R29vZ2xl/AVvXsEjp155GSNUnmLFNic-8qUrzMWQCqHCaouJ4Sg-UilU3IBjpvE-AfeUERxfUoAa0lxbH9f-VQ5n3tVbxjTpjbXWyfGrnynFjje4zi2x36TsAw3mdExWJWLiDZblMQIIyXtnCo17js_mnqzgc/s1600/profile-pic.png'/>
<h3 class='boxtitle'>Meet the Author</h3>
<p>Ut eleifend tortor aliquet, fringilla nunc non, consectetur magna. Suspendisse potenti.</p>
</div>
</div>
</div>
<p align="right" style="margin-top: 10px;">Looking for something?</p>
<form method="get" action="/search" id="search-box22">
  <input name="q" type="text" size="40" placeholder="Search..." />
</form>

</div>

<!-- second section -->
<div class='left' style='width:320px !important'>
<h4>Categories</h4>

<div id='sliding-panel'>
<ul>
<li><a href='Link URL'>Category 1</a></li>
<li><a href='Link URL'>Category 2</a></li>
<li><a href='Link URL'>Category 3</a></li>
<li><a href='Link URL'>Category 4</a></li>
<li><a href='Link URL'>Category 5</a></li>
<li><a href='Link URL'>Category 6</a></li>
<li><a href='Link URL'>Category 7</a></li>
</ul>
</div>

<div id='sliding-panel2'>
<ul>
<li><a href='Link URL'>Category 1</a></li>
<li><a href='Link URL'>Category 2</a></li>
<li><a href='Link URL'>Category 3</a></li>
<li><a href='Link URL'>Category 4</a></li>
<li><a href='Link URL'>Category 5</a></li>
<li><a href='Link URL'>Category 6</a></li>
<li><a href='Link URL'>Category 7</a></li>
</ul>
</div>
</div>

<!-- third section -->
<div class='left right' align="center">

<h4>Subscribe to this blog!</h4>
<p style="padding:0px 30px;">Receive the latest posts by email. Just enter your email below if you want to subscribe!</p>

<form action='http://feedburner.google.com/fb/a/mailverify?uri=Feed-Name' method='post' target='_blank'>
<input class='field' name='email' type='text/' value=''/>
<input name='uri' type='hidden' value='Feed-Name'/>
<input name='lang' type='hidden' value='en_EN'/>
<input class='button-register' type='submit' value='Subscribe'/></form>

<div align='center' style="clear: both;">
<a href='http://www.facebook.com/username'><img title="Follow on Facebook" src='https://blogger.googleusercontent.com/img/b/R29vZ2xl/AVvXsEi9yaYNijNeJhH8Liu6vREhh83Cd8HjjhKlyswt-oz84T4XJSZJUOj50H_evtHxJrYN3X3LUUoUr1hC807Eg-akskd7OthrhVHM3V3ij6g8CnAJxtgqBIislASmbRySWYOX3SE4HBicxKSt/s1600/Facebook.png' style='padding:5px;' width='32'/></a>
<a href='http://blog-address.blogspot.com/atom.xml'><img title="RSS Feed" src='https://blogger.googleusercontent.com/img/b/R29vZ2xl/AVvXsEiKoos-BAc8ENuDRXH6nvUmY30qfU6JrJFgM2j_ksp8QfyUAa26QKP6qgA5mHTk2HC4X0LA1TJbeBeGjvmOJKf_b-gBqvpOyvPnmrFHkyGhX4yeI7S8X3IU0ty_7l8X16Zs_VroN7ICVve9/s1600/RSS.png' style='padding:5px;' width='32'/></a>
<a href='https://plus.google.com/username'><img title="Follow on Google" src='https://blogger.googleusercontent.com/img/b/R29vZ2xl/AVvXsEi6xSjVGF0u2bCts__qjA7LFAQdVO1dwSLFQi4dCnO7gD1EyBRD5RhDlwOi3qUOclhosdTlxXJ-lPLFdNU1s4jzFL-NJyc1ZCPZOgkQaVBAWNuDHPcMp0IgJicQRjTZU7iD-5hYygyPDRF_/s1600/Google-plus.png' style='padding:5px;' width='32'/></a>
<a href='http://twitter.com/username'><img title="Follow on Twitter" src='https://blogger.googleusercontent.com/img/b/R29vZ2xl/AVvXsEgBF2Gcqd60eM_Xxnw1fgsyXd6n_njG2ixtjohOEh8MWvIBJcGb-YFqy86u-lny7wSBdm53_qCuduqOOscWA9Ecy5BXUxNvM0AKnwz5MgiiQFSDuTtkcYVmCuaCGJRWIb9lWTFQsTT-1dZM/s1600/Twitter.png' style='padding:5px;' width='32'/></a>
</div>

</div>
</div>
</div>

<div class='tab'>
<ul class='login'>
<li class='left'/>
<li>Hello guest!</li>
<li class='sep'>|</li>
<li id='toggle'>
<a class='open' href='#' id='open'>Open menu</a>
<a class='close' href='#' id='close' style='display: none;'>Close menu</a>
</li>
<li class='right'/>
</ul>
</div>
</div>
Note: if you can't find the <body> tag, then try to find this one:
<body expr:class='&quot;loading&quot; + data:blog.mobileClass'>
Here we have added the content in the sliding panel which will be hidden and will show on mouse click. In green are the names of each section so to make it easier to recognize them.

Note:
- In the first section, you can change the welcome message, "Meet the author" title and add your description by replacing the text in bold. To add your own picture, replace this URL:
https://blogger.googleusercontent.com/img/b/R29vZ2xl/AVvXsEjp155GSNUnmLFNic-8qUrzMWQCqHCaouJ4Sg-UilU3IBjpvE-AfeUERxfUoAa0lxbH9f-VQ5n3tVbxjTpjbXWyfGrnynFjje4zi2x36TsAw3mdExWJWLiDZblMQIIyXtnCo17js_mnqzgc/s1600/profile-pic.png
- In the second section you have the categories - there add the URLs of your links by replacing the addresses in blue and replace Category 1, 2, 3... with the titles that you want to appear for the links.
- In the third section is the email subscription - you must have enabled this option in your Feedburner account - just replace the text in blue with the name of your blog's feed. As for the social icons below, change the URLs in blue with your Facebook and Twitte and add the URL of your blog's RSS feed address.

Basically, those are the main sections that can be customized, though, we can take some parts and paste something else instead.

Step 6. Save the template and that's it! Note that this menu works with jQuery, so if you are already using Scriptaculous, Prototype or Mootools, then it will not work.

I hope you'll enjoy this elegant menu with sliding effect, which will look way better if we remove the Blogger navbar.

Minggu, 26 Mei 2013

How To Add Social Media Icons to Blogger Header

social media icons, facebook icons, social media icons for bloggerThis tutorial will help you to add social media icons in the top right corner of the page which could increases the likelihood that readers can follow through the various social networks. There are several ways to do this, like adding a new widget section to the blog header but now, we'll do it using an unordered list that uses icons of Facebook, Twitter, Google+ and blog feed, and as a bonus, the icons will rotate when you hover over them.

You can see a demo in this test blog.


Adding Social Media Icons to Blogger Header

Step 1. From your Blogger dashboard, go to Template and click on the Edit HTML button:

blogger blogspot, blogger template, blogger gadgets

Step 2. To expand the style, click on the small arrow on the left of <b:skin>...</b:skin> (screenshot 1), then click anywhere inside the code area to search (using CTRL + F) for the ]]></b:skin> tag (screenshot 2) and add this code just above it:

 /* Social icons for Blogger
----------------------------------------------- */

#social-icons {
margin-bottom:-30px;
height:50px;
width:100%;
clear:both;
z-index: 2;
position: relative;
}
.social-media-icons {
display:table
}
.social-media-icons ul {
text-align:right;
padding:5px 5px 0 0
list-style-image:none;
list-style-position:outside;
list-style-type:none;
}
.social-media-icons ul {
margin-bottom:0;
padding:0;
float:right;
}
.social-media-icons li.media_icon {
margin-left:6px;
padding-left:0 !important;
background:none !important;
display:inline;
float:left;
}
.social-media-icons li:hover {
-moz-transform: rotate(360deg);
-webkit-transform: rotate(360deg);
-o-transform: rotate(360deg);
transform: rotate(-360deg);
-moz-transition: all 0.5s ease-in-out;
-webkit-transition: all 0.5s ease-in-out;
-o-transition: all 0.5s ease-in-out;
-ms-transition: all 0.5s ease-in-out;
transition: all 0.5s ease-in-out;
}

Screenshot 1:


Screenshot 2:


Step 3. Now search for this line

<b:section class='header' id='header' maxwidgets='1' showaddelement='no'>

Step 4. And just above it, add this code:

<div class='social-media-icons' id='social-icons'>
<ul>

<li class='media_icon'><a href='http://facebook.com/username'><img border='0' src='https://blogger.googleusercontent.com/img/b/R29vZ2xl/AVvXsEhRrDFV3ReZ0jf95z1i7aCnlAVd4p2FG8m0A_zl_cVYA6_HTcPkfW9CAEAr2lbvUq-OBeT31N0WgWb6Mp8XBX4CuV6ffZnODKEe4UN1Jb3j5HTfYs9iv31zez5lWZqJm00gy86afosXmeU/s1600/Facebook.png'/></a></li>

<li class='media_icon'><a href='http://twitter.com/#!/username'><img border='0' src='https://blogger.googleusercontent.com/img/b/R29vZ2xl/AVvXsEgrY6VEpDCnHITgbMG-04WptavoTiUZfUrAJ2cA7WEnAdq_7dJqetu-kwLxOR316ziEMlFJAoLvxUaCQLJfCeichrVq6wYNlZEKYYF14rTGt_OtxzQZX4YWeuMXyMRCt9NEgkhQDXSe_Ro/s1600/Twitter.png'/></a></li>

<li class='media_icon'><a href='https://plus.google.com/XXXXXXXXXXXXXXXXXX/about'><img border='0' src='https://blogger.googleusercontent.com/img/b/R29vZ2xl/AVvXsEj8XlyEZHQsYxrenxTajVZ7HBqcLYu9mwRdGbGog6FYfoUWwZX8Dfl8yWew-q3QsVHKmDVVd91pc8neQ623mvZBifdq6ON6H6F5c0exLpB0L4tdg-93I9ohExp_fafFZ08WNgugejWdmZ4/s1600/googleplus.png'/></a></li>

<li class='media_icon'><a href='http://name-of-your-blog.com/feeds/posts/default'><img border='0' src='https://blogger.googleusercontent.com/img/b/R29vZ2xl/AVvXsEiOQEt6HEgh2F2CmLNwcUAwFQGna2SlfGA-gD47B3RK4uO3MSYyZjsnQxhzdAoRYseDDQqlydZbq3QKc_xRMnpRrn9v8badZImUxERgGdbvjZsNtJbaxPElz8imOWvVqF7KMT8nWfRPu2w/s1600/RSS.png'/></a></li>

</ul></div>

Customization

- Change what's in red with your usernames and id: the first is your Facebook username, the second is that of Twitter, in the third you should change the X by the ID of your Google+ profile and in the fourth you will put the name of your blog.
- To change the icons, just replace the urls in blue with the ones of your images.
- You can add more icons if you want, you just have to add before </ul></div> a line like this for each extra icon you want:

<li class='media_icon'><a href='Link URL'><img border='0' src='Image URL'/></a></li>

Step 5. Finally, Save the Template to apply the changes.
The effect is done with CSS3, so this effect will not work in older browsers.

Kamis, 31 Mei 2012

Add Floating Social Media Sharing Buttons To Blogger

The Floating Social Media Sharing is a very popular widget on all the top blogs and this is one of the ways to increase the number of times your posts get shared on Twitter, Facebook and other social networks.

This floating social bar has the following options: Facebook Like, StumbleUpon, Twitter Share, Digg This, Google+ and each of them comes with a live counter. You can add more sharing buttons or social bookmarking icons later if you want.

Blogger, WordPress, Facebook, Share

How to add the scrolling social bookmarking bar


Step 1. Log in to your Blogger Dashboard, select your blog and go to Layout 

Step 2. Click on Add A Gadget link


Step 3. From the pop-up window, scroll down and select HTML/Javascript 

Step 4. Copy the code below and paste it inside the empty box.

Step 5. Save the gadget.

The code to copy-paste (updated!):
<style type="text/css">
#social-buttons {
position:fixed;
bottom:15%
margin-left:-721px;
float:left;
border-radius:5px;
-moz-border-radius:5px;
-webkit-border-radius:5px;
background-color:#fff;
padding:0 0 2px 0;
z-index:10;
}
#social-buttons .button-share {
float:left;
clear:both;
margin:5px 5px 0 2px;
}
</style>
<div id='social-buttons' title="Get this from helplogger.blogspot.com">
<div class='button-share' id='like' style='margin-left:7px;'>
<div id="fb-root"></div>
<script>(function(d, s, id) {
  var js, fjs = d.getElementsByTagName(s)[0];
  if (d.getElementById(id)) return;
  js = d.createElement(s); js.id = id;
  js.src = "//connect.facebook.net/en_US/all.js#xfbml=1";
  fjs.parentNode.insertBefore(js, fjs);
}(document, 'script', 'facebook-jssdk'));</script>
<div class="fb-like" data-send="false" data-layout="box_count" data-width="40" data-show-faces="false"></div>
</div>
<br /><div class='sbutton' style="margin-left: 2px;" ><a class='twitter-share-button' data-count='vertical' data-via='Helplogger' expr:data-counturl='data:blog.url' href='http://twitter.com/share' rel='nofollow'>Tweet</a><script src='http://platform.twitter.com/widgets.js'; type='text/javascript'></script>
<br />
<div class='button-share' style="margin-left: 3px;" id='su'>
<script src="http://www.stumbleupon.com/hostedbadge.php?s=5"></script>
</div>
<div class='button-share' id='digg' style='margin-left:3px;width:48px'>
<script src='http://widgets.digg.com/buttons.js' type='text/javascript'></script>
<a class="DiggThisButton DiggMedium"></a>
</div>
<div class='button-share' style='margin-left:3px;' id='gplusone'>
<script type="text/javascript" src="https://apis.google.com/js/plusone.js"></script>
<g:plusone size="tall"></g:plusone>
</div>
<div style="clear: both;font-size: 9px;text-align:center;">Get <a style="color: #3399BB;" href="http://helplogger.blogspot.com/">widget</a></div></div></div>
Customization:
  • Vertical alignment - Change the 15% value of bottom. The code positions the social bar relative to the bottom of your browser window. To fix the distance even when window is resized, specify the value in px (pixels) instead of %.
  • Horizontal alignment - Change the -721px value from margin-left. Negative value pushes the button to the left of the main blog column, positive value pushes it to the right. Increase or decrease the value based on your needs.
  • Twitter setting - Replace Helplogger with your Twitter username
  • Replacing and removing buttons - You can replace existing buttons with your own. Each button is represented by this code:
<div class='sbutton'> BUTTON CODE HERE </div>
    Enjoy!!! :)

    Jumat, 06 April 2012

    Add Static Facebook Pop Out Like Box with Smooth Jquery Hover Effect

    In this tutorial, I will show you how to add a cool floating Facebook like widget for Blogger that slides to the left on mouseover. Demo: You can see a static Facebook badge on the right side of this blog:


    Adding Static Facebook Like widget on Blogger

    Step 1. Log in to your Blogger account, go to "Template" and hit the "Edit HTML" button

    Step 2. Click anywhere inside the code area and press the CTRL + F keys to open the search box:


    Step 3. Search (CTRL + F) for this tag:
    </head>
    Step 4. Add the following code just before/above </head> tag:
    <script src="https://ajax.googleapis.com/ajax/libs/jquery/1.7.1/jquery.min.js"></script>
    Step 5. Save the Template.

    Step 6. Go to Layout > Add a new Gadget > select the 'HTML/JavaScript' gadget and paste the code below in the HTML box:
    <style type="text/css">
    #fbplikebox {
        display: block;
        padding: 0;
        z-index: 99999;
        position: fixed;
        background: #ffffff;
    }

    .fbplbadge {
        background-color: #3B5998;
        display: block;
        height: 150px;
        top: 50%;
        margin-top: -75px;
        position: absolute;
        left: -47px;
        width: 47px;
        background-image: url("https://blogger.googleusercontent.com/img/b/R29vZ2xl/AVvXsEgazRwUKdVd3Ftl8jDM-tBf0oyHDxCUp2mqvj9TFK5Vg-gxMP9bUdb9eb2V-NcpYXsFqmF6C8wIdkK1PzWvstYXrGBilIuJivkDcRvCX7XV9IXP8WfmZUuez1C98wWgAl5oosM__rqcjZc/s1600/vertical-right.png");
        background-repeat: no-repeat;
        overflow: hidden;
        -webkit-border-top-left-radius: 8px;
        -webkit-border-bottom-left-radius: 8px;
        -moz-border-radius-topleft: 8px;
        -moz-border-radius-bottomleft: 8px;
        border-top-left-radius: 8px;
        border-bottom-left-radius: 8px;
    }
    </style>
    <script type="text/javascript">
    /*<![CDATA[*/
        (function(w2b){
            w2b(document).ready(function(){
                var $dur = "medium"; // Duration of Animation
                w2b("#fbplikebox").css({right: -250, "top" : 100 })
                w2b("#fbplikebox").hover(function () {
                    w2b(this).stop().animate({
                        right: 0
                    }, $dur);
                }, function () {
                    w2b(this).stop().animate({
                        right: -250
                    }, $dur);
                });
                w2b("#fbplikebox").show();
            });
        })(jQuery);
    /*]]>*/
    </script>
    <div id="fbplikebox" style="display:none;">
        <div class="fbplbadge"></div>
        <iframe src="http://www.facebook.com/plugins/likebox.php?href=YOUR-FACEBOOK-PAGE&amp;width=250&amp;height=250&amp;colorscheme=light&amp;show_faces=true&amp;border_color=%23C4C4C4&amp;stream=false&amp;header=false" scrolling="no" frameborder="0" style="border:none; overflow:hidden; width:250px; height:250px;" allowtransparency="true"></iframe>
    </div>
    Step 7. Replace YOUR-FACEBOOK-PAGE text with your Facebook fan page URL. Then, you will need to replace the following characters in the URL, as follows:

    The  symbol with:
    %3A
    The  symbol with:
    %2F
    For example, the Facebook fan page of this blog is:
    http://www.facebook.com/pages/Helplogger/120574614736021
    After replacing the above symbols, the Facebook fan page would look like this:
    http%3A%2F%2Fwww.facebook.com%2Fpages%2FHelplogger%2F120574614736021
    Other settings (optional):
    - to change background color of the fan box, replace the #ffffff value in red. You can pick the favorite color using this Color Code Generator.
    - to change the Facebook badge color, replace the #3B5998 color value with your own.
    - to change the width and height of the Facebook box, change the values in red (250)

    Step 8. Now you can save this static Facebook fan box widget - press the 'Save' button. Enjoy!

    Credit goes to Harish (way2blogging)

    Sabtu, 17 Maret 2012

    Add Facebook Like Button Below Post Titles

    facebook like button, blogger tricks

    This Facebook Like button will allow visitors to Like your post and share it to their Facebook friends. In this post we will see how we can add a Like button for each individual Blogger post, and not a Facebook fan box for the entire blog (which is also a good idea to have in your sidebar). Having a Facebook Like button below your post titles makes easier for Facebook users to like specific posts on your blog, which in turn displays the liked content on their profile (and potentially on their friend's feeds).
    If you want to add the Facebook Like Button below your blogger post title, then follow these steps:

    Adding Facebook Like Button Below Post Titles


    Step 1. Go To Blogger Dashboard > Template > Edit HTML 

    Screenshot 
    facebook for blogger, facebook button

    Step 2. Click anywhere inside the code area and search - using CTRL + F keys - for this piece of code:
    <data:post.body/>
    Note: you might find it more than 3 times, stop to the second one (or third one in case it won't show up after applying the code from step 3)

    Step 3.  Just above it, paste this code:
    <p><iframe allowTransparency='true' expr:src='&quot;http://www.facebook.com/plugins/like.php?href=&quot; + data:post.url + &quot;&amp;layout=button_count&amp;show_faces=false&amp;width=100&amp; action=like&amp;font=arial&amp;colorscheme=light&quot;' frameborder='0' scrolling='no' style='border:none; overflow:hidden; width:100px; height:20px;'/></p>
    Screenshot

    facebook button

    Step 4. Save your template and you are done with this simple implementation of the Facebook Like button on your Blogger blog.

    Senin, 12 Maret 2012

    How to add Facebook Like/Fan Box to Blogger

    A Facebook Fan Box or Like Box is a great plugin that allows blog visitors to subscribe to your blog updates via their Facebook accounts, without leaving your blog. Once subscribing (by pressing the like button), visitors will receive your most recent blog updates on their Facebook page. This box also displays faces of the "likers" on your blog. Before creating a fan box, you should already have a Facebook fan page. If you haven't yet created, click here to learn How to Create a Facebook Fan Page.

    facebook like box

    Create a Facebook Like Box

    1. Find out your Facebook fan page URL by visiting your Facebook fan page and copy the URL in the address bar - you can see how your URL should look like in this screenshot:

    facebook page address

    2. Then visit this page: http://developers.facebook.com/docs/reference/plugins/like-box

    3. Paste your URL into the Facebook Page URL field, as it is shown below:

    create facebook fan box

    4. Once you are satisfied with the looks of the Like Box, click on the "Get Code" button

    5. You'll be given two codes, titled HTML 5, XFBML and IFRAME. The one we need is the 'iframe' code. Select it and copy the code generated in this box, as it is shown in the example below:

    facebook iframe code

    Add the Facebook Fan Box to Blogger

    6. Log in to your Blogger account, go to 'Layout' > click on the 'Add a Gadget' link

    blogger layout, add a gadget

     7. From the pop-up window, scroll down and select the 'HTML/JavaScript' gadget:

    html / javascript, blogger gadget

    8. Paste the code in the empty HTML box:

    javascript html gadget

    9. Click Save and you're done.

     
    Design by Free WordPress Themes | Bloggerized by Lasantha - Premium Blogger Themes | Best Web Hosting