

 09.03
09.03
 Unknown

Frederic Lardinois May 5, 2012 As we put more of our private information online and entrust it to web services, privacy breaches become almost inevitable. One major problem with online privacy is that there is really no enforceable chain of confidentiality. So when a third-party service makes your information available to another party, things can get complicated. A new paper by Samford University law professor Woodrow Harzog argues that traditional privacy laws aren’t the best ways to protect private information online. Instead, he suggests an approach that’s more like the U.S. HIPAA rules that currently govern how private health information can be shared between your health provider and third parties. The system he proposes would be based on established principles in confidentiality and contract law. Confidentiality law, says Harzog, typically only binds the first recipient of information. Online, that obviously isn’t enough to protect a user’s privacy and most scholars have argued that confidentiality law is simply not suited to deal with online privacy issues. Harzog, however, argues that a HIPAA-like “chain-link confidentiality” regime would be more effective in protecting users’ privacy than current regulations. This system would not just ensure confidentiality between the user and the first service where data is stored, but the obligation of confidentiality would also flow downstream. Under this regime, he writes, “Internet users could then pursue a remedy against anyone in the chain who either failed to abide by her obligation of confidentiality or failed to require confidentiality of a third-party recipient.” Harzog argues that our current privacy regulations are “a patchwork of laws and remedies” and often in conflict with other laws and evolving technologies. It’s also often unclear how “privacy” is actually defined and what, for example, constitutes a “reasonable expectations of privacy.” In Harzog’s view, “traditional privacy remedies are inadequate in the digital age.” Here is what chain-link confidentiality on the Internet would look like in practice: a website that collects your personal information (and that explicitly allow to share your information with other services) would also have to establish a confidentiality contract with any other company it discloses your information to – and those companies would be required to establish the same kind of contract with every subsequent recipient as well. These contracts, of course, could also simply prohibit any further dissemination of your personal information or limit it to certain companies or companies that fulfill certain security requirements. Every web service could, of course, also tweak this contract depending on its needs. In a way, this isn’t all that different from the Creative Commons “Share Alike” provision: depending on the Creative Commons license used – artist can allow others to remix their work, for example, as long as it is then shared under the same license terms as the original work. The chain-link confidentiality approach then would allow for the flow of information, says Harzog, ” by continually re-creating an environment for sharing that accommodates the sender, receiver, and the subject of the personal information.” Even though this isn’t a cure-all – your information, after all, could still leak out or be scraped by others – it’s an interesting way of looking at privacy from a more contractual point of view, especially because it sets up a legal framework for sharing information between services. For the more lawyerly and in-depth discussion of this, take a look at Harzog’s paper here.
This is featured post 1 title
Replace these every slider sentences with your featured post descriptions.Go to Blogger edit html and find these sentences.

This is featured post 2 title
Replace these every slider sentences with your featured post descriptions.Go to Blogger edit html and find these sentences.

This is featured post 3 title
Replace these every slider sentences with your featured post descriptions.Go to Blogger edit html and find these sentences.

Minggu, 06 Mei 2012
How to Change Default Anonymous Avatar in Blogger Comments
Earlier, you've seen how you can change the size of the avatars in blogger comments and now I will show you how to change or customize the default avatar of anonymous commenters or Blogger users with no picture on their profiles. While Blogger announced the new threaded commenting system, we can still customize it by adding a jQuery plugin to our template and then replace the default anonymous avatar that can be found on this address: http://img1.blogblog.com/img/anon36.png and the one for blogger users: http://img2.blogblog.com/img/b36-rounded.png ...with our own.

Step 1. Go to Dashboard - Template - click on the Edit HTML button

...click anywhere inside the code area and open the template search box by pressing the CTRL + F keys
Step 2. Type or paste this code in the search box, then hit Enter to find it:
For Blogger users: Replace the URL in blue with your own.
You can choose an avatar from here and then copy the url of it:


That's it! If you found this trick useful, please consider sharing it.
Replace the Default Anonymous Avatar on Blogger Comments
Step 1. Go to Dashboard - Template - click on the Edit HTML button
...click anywhere inside the code area and open the template search box by pressing the CTRL + F keys
Step 2. Type or paste this code in the search box, then hit Enter to find it:
</body>Step 3. Just above the </body> tag, add the following code:
<script src='http://code.jquery.com/jquery-latest.js'/>Step 4. Save the changes by clicking on the Save Template button
<script>
$("img[src='http://img1.blogblog.com/img/anon36.png']")
.attr('src', 'https://blogger.googleusercontent.com/img/b/R29vZ2xl/AVvXsEjagSTzc14eIMxfpeFvriRRuzL3dSDk5qc97ltATE47t3NJ84rkMxgIIQyzp_iqeH2kmUWDI0znxR2TkRrgql5AdG6bIGdMJ1ZuYB1YlwdA3oA6FRt5rUKQhFNWIWiOrVdx8qVuxasL134/s1600/default_avatar.gif')
.ssyby('blank')
</script>
<script src='http://code.jquery.com/jquery-latest.js'/>
<script>
$("img[src='http://img2.blogblog.com/img/b36-rounded.png']")
.attr('src', 'https://blogger.googleusercontent.com/img/b/R29vZ2xl/AVvXsEieh363w1F9h4PzmBQG0UHRgkS2hANuRk5i1IFw7jnqbdzDxLk1pSqCsCNO60kcKkhUwwWH4IMFtSQ8vYSM03FtWmmgohVp9vjw_WpiL6HnlOmjtn5Toa_gIblQwmH6IT6ipXC_8YULnS8/s1600/blogger-user.png')
.ssyby('blank')
</script>
Changing the default avatar
For Anonymous users: Replace the code in red with your image addressFor Blogger users: Replace the URL in blue with your own.
You can choose an avatar from here and then copy the url of it:
https://blogger.googleusercontent.com/img/b/R29vZ2xl/AVvXsEjagSTzc14eIMxfpeFvriRRuzL3dSDk5qc97ltATE47t3NJ84rkMxgIIQyzp_iqeH2kmUWDI0znxR2TkRrgql5AdG6bIGdMJ1ZuYB1YlwdA3oA6FRt5rUKQhFNWIWiOrVdx8qVuxasL134/s200/default_avatar.gif
https://blogger.googleusercontent.com/img/b/R29vZ2xl/AVvXsEiaAXZaGdBpMUDCC6fsvXW37_4VnuLjUdAjNZfUo7DVvKlqmeQU_2fni4PJ-DRMJRatL7Kk_xIfmVxEmjLGHKRHkNmnJZUa1iOE3DCIVzAzyUVI9a1xnH8CdWaipH2mEUbAWSr3nKQZEfA/s1600/facebook.gif
https://blogger.googleusercontent.com/img/b/R29vZ2xl/AVvXsEjM7uHf4T6XpVT5iETEMnppU4LlGNyxN1tEN5e2UctUICNQiKdeAd4sBKukSCxWSuvITS7fDA65HyuIrYx6ZEJPuRC_VXsC0yIqiyiOBgp6a4ptECtBH706miPHUh69UJht0xI9-52Hx2c/s1600/anonymous3.png
https://blogger.googleusercontent.com/img/b/R29vZ2xl/AVvXsEgSA4kIdgA2R-v9QbMba_X1cAPWDT-jvF_IzLsXiVX0DuF_9FRPqEF-kd2ydkGc-rtFlceDLeYzMrI9ufGMg5M2f4O02FViDT0K2wY-5ByuYD7PQQPPQmzwPFW4o8qbPyQaHEto5UGaxXw9/s1600/blogger-user.png
That's it! If you found this trick useful, please consider sharing it.

Sabtu, 05 Mei 2012
How To Change Avatar Size In Blogger Comments
This simple trick will help you modify the avatars size in Blogger comments whose default size is of 36px... pretty small considering that a lot of sites these days are using much larger avatars. To change the style and size of avatars is very easy - you just need to add the CSS code in your Blogger template that will make size of avatars to have width and height of 64px.

Step 1. Go to Dashboard - Template - click on the Edit HTML button
...click anywhere inside the code area and press CTRL + F to open the blogger' search box

Step 2. Type or paste this tag inside the search box and hit Enter to find it:
[Works in Blogger threaded comment system]
Step 4. Cick on the Save template button to apply the changes.
That's it. Now the Blogger comments avatars should look bigger.

Step 1. Go to Dashboard - Template - click on the Edit HTML button
...click anywhere inside the code area and press CTRL + F to open the blogger' search box
Step 2. Type or paste this tag inside the search box and hit Enter to find it:
]]></b:skin>
Note: you may need to click on the arrow next to it and then search this tag again
Step 3. Depending on which comment system you use (with reply/no reply), copy and paste one of the following codes just above it:[Works in Blogger threaded comment system]
.comments .avatar-image-container{[for old blogger commenting system]
background-color: rgb(34, 34, 34);
border:1px solid #ccc;
margin: 0px 10px 0px 0px;
padding: 0px 0px 0px 0px;
width: 64px;
max-height: 64px;
}
.comments .avatar-image-container img{
margin: 0px 0px 0px 0px;
padding: 0px 0px 0px 0px;
max-width: 64px;
height: 64px;
}
.avatar-image-container{Note: For bigger/smaller avatars, change the values in red. To change the anonymous avatar, replace the URLs in blue with your own. (works only for the old commenting system i.e. that has no reply option)
border:1px solid #d6d6d6;
margin-left: -30px;
-moz-border-radius: 4px;
background:#fff;
height:70px;
min-height: 70px;
width:70px;
min-width:70px;
}
.avatar-image-container img {
background: url(https://blogger.googleusercontent.com/img/b/R29vZ2xl/AVvXsEjIKHEQ2paQgWojEQAstQEBoz69SULZNbjZuHv5ryHgywbLWCjp3547yKnZY6nvupv5k9AXw6c8nKQk-IMuseTMBezlz_RS4ldsG7yrRbtl0LZUIOfGFn-Sxwxga9wnHCCjIAS1gJdBrqo/s200/anonymous.jpg);
background-repeat: no-repeat;
background-position: center;
background-size: 100%;
width:70px;
min-width:70px;
height:70px;
min-height:70px;
}
Step 4. Cick on the Save template button to apply the changes.
That's it. Now the Blogger comments avatars should look bigger.
How to Hide Blogger Sidebar to Display AdSense For Search Results
When visitors are searching for content on your blog, you have three options to display the search results: opening the results in the same window, in a new window or within your own site using an iframe.
The best option would be, however, to display the search results within your own site/blog, mainly because you are not sending people off your blog when they are taken to a new page of search results which could be confusing for many because it doesn't look anything like your site or Google. Therefore, displaying the search results within your site, could make it look much more professional and may also increase the page views and the revenue from the ads on the search page.
A problem that many bloggers are facing is that the page which displays the AdSense for search results must be at least of 800 px wide, so the posting area must be of minimum 800px and there's nothing like this in most of the blogs.
So, what we will do in this tutorial is to set up the search results to be displayed in a static page (none of other posts or pages will be affected) in which we'll remove the sidebar so that we'll have enough space to make the post/page section of 800px wide. Moreover, we will create a static page designed only for the search results, then create a new AdSense for search in our AdSense account and finally add a small snippet of code top in your Blogger template to hide the sidebar in that specific page.
Search results span the width of the page with the sidebar hidden:

Display AdSense For Search Results Within Blogger Page
Step 1. Create a new static page on your blog, you can give it the title 'Search Results' but leave the content section empty and then Publish the page.
Step 2. When you publish the page you have the option to add the page to a menu, choose the third option 'No Gadget Link To Pages Manually' click 'Save and Publish'. In case this screen doesn't show, right click on View Page and select Copy Link Address. We will need this URL of the page later when we will create the AdSense for search.
Step 3. Go To Your AdSense account, then go to My ads tab, select the Search option and Create a New custom search engine. Follow the steps until you come to the Search results option.
Step 4. Select the 3rd method "on my website using an iframe", then Enter the URL of the page you created into the URL field and continue.

Step 5. Follow the rest of the set up process and at the end you will be given two pieces of code. The first piece of code is for the actual search bar which you can paste into a Html/JavaScript gadget on your sidebar or wherever you want it. The second piece of code you need to copy and paste it into a new HTML/JavaScript gadget, click on Save, then drag it above the Blog Posts area

Now that you have your page set up with the search results code and your search bar code in your sidebar, it is time to add a snippet of code to your template to remove the sidebar.
Adding The Code In Blogger To Change the Results Page Layout
Step 1. From Your Blogger Dashboard, go to Template and click on the Edit HTML button
Step 2. Click anywhere inside the code area and press the CTRL + F keys to open the Blogger' search box
Step 3. Find (CTRL + F) the following piece of code
Note: Replace PAGE-URL-HERE with the url of the page where the search results will be displayed (the one you have added at the step 4)
Step 5. Now Save Template and you're done!
This simple trick allows you not only to hide the sidebar in the search results page, you can as well, hide it on any page you want... just create your page and follow the same steps. It is also recommended to hide the sidebar in Privacy Policy Pages, Contact Pages and on all the non-content-based pages with little content or no content at all.
The best option would be, however, to display the search results within your own site/blog, mainly because you are not sending people off your blog when they are taken to a new page of search results which could be confusing for many because it doesn't look anything like your site or Google. Therefore, displaying the search results within your site, could make it look much more professional and may also increase the page views and the revenue from the ads on the search page.
A problem that many bloggers are facing is that the page which displays the AdSense for search results must be at least of 800 px wide, so the posting area must be of minimum 800px and there's nothing like this in most of the blogs.
So, what we will do in this tutorial is to set up the search results to be displayed in a static page (none of other posts or pages will be affected) in which we'll remove the sidebar so that we'll have enough space to make the post/page section of 800px wide. Moreover, we will create a static page designed only for the search results, then create a new AdSense for search in our AdSense account and finally add a small snippet of code top in your Blogger template to hide the sidebar in that specific page.
Search results span the width of the page with the sidebar hidden:
Display AdSense For Search Results Within Blogger Page
Step 1. Create a new static page on your blog, you can give it the title 'Search Results' but leave the content section empty and then Publish the page.
Step 2. When you publish the page you have the option to add the page to a menu, choose the third option 'No Gadget Link To Pages Manually' click 'Save and Publish'. In case this screen doesn't show, right click on View Page and select Copy Link Address. We will need this URL of the page later when we will create the AdSense for search.
Step 3. Go To Your AdSense account, then go to My ads tab, select the Search option and Create a New custom search engine. Follow the steps until you come to the Search results option.
Step 4. Select the 3rd method "on my website using an iframe", then Enter the URL of the page you created into the URL field and continue.
Step 5. Follow the rest of the set up process and at the end you will be given two pieces of code. The first piece of code is for the actual search bar which you can paste into a Html/JavaScript gadget on your sidebar or wherever you want it. The second piece of code you need to copy and paste it into a new HTML/JavaScript gadget, click on Save, then drag it above the Blog Posts area
Now that you have your page set up with the search results code and your search bar code in your sidebar, it is time to add a snippet of code to your template to remove the sidebar.
Adding The Code In Blogger To Change the Results Page Layout
Step 1. From Your Blogger Dashboard, go to Template and click on the Edit HTML button
Step 2. Click anywhere inside the code area and press the CTRL + F keys to open the Blogger' search box
Step 3. Find (CTRL + F) the following piece of code
]]></b:skin>
Step 4. Just below it, paste this code:
<b:if cond='data:blog.url == "PAGE-URL-HERE"'>
<style>
.main-inner .columns {
padding-left: 0px !important;
padding-right: 0px !important;
}
.main-inner .fauxcolumn-center-outer {
left: 0px !important;
right: 0px !important;
}
.main-inner .fauxcolumn-left-outer, .main-inner .fauxcolumn-right-outer, .main-inner .column-left-outer, .main-inner .column-right-outer {
display: none !important;
}
</style>
</b:if>
Note: Replace PAGE-URL-HERE with the url of the page where the search results will be displayed (the one you have added at the step 4)
This simple trick allows you not only to hide the sidebar in the search results page, you can as well, hide it on any page you want... just create your page and follow the same steps. It is also recommended to hide the sidebar in Privacy Policy Pages, Contact Pages and on all the non-content-based pages with little content or no content at all.
Show Blogger Image only in Homepage and Hide it in Post Page

To hide images/pictures from blogger posts and make them appear only in homepage, we will add just a small piece of CSS code in our template and then use the class "hidepic" each time we want to hide an image.
Just follow the next steps:
Step 1. Go to Dashboard - Template - Edit HTML

Step 2. Click anywhere inside the code area and press the CTRL + F keys to open the search box:
Step 3. Type or paste this code inside the search box then hit Enter to find it:
]]></b:skin>
Step 4. Paste the following code just below it
<b:if cond='data:blog.pageType != "index"'>Step 5. Save the Template.
<style>
.hidepic{
display: none;
}
</style>
</b:if>
Now, each time you create a post, first add the picture that you want to hide and then switch to the HTML tab where you'll see the HTML code of the image that you added - it will look something like this:
<div class="separator" style="clear: both; text-align: center;">
<a href="https://blogger.googleusercontent.com/img/b/R29vZ2xl/AVvXsEis6MZ7a0-0k100j7pZGO2kLynmgZo3pcpCF6_ZMD8x29iv9AzLgLWjxVQnuHz5uZXSHSe6sh_moHAM9ncgXt7XglgTmp2Oy6uhFZdv8MyniIfA5o_ZggR6-Sr6A5FS6ZJcI49pyfPdq_o/s1600/fire_bird_by_fhrankee-d32af8v.png" imageanchor="1" style="margin-left: 1em; margin-right: 1em;"><img border="0" height="320" src="https://blogger.googleusercontent.com/img/b/R29vZ2xl/AVvXsEis6MZ7a0-0k100j7pZGO2kLynmgZo3pcpCF6_ZMD8x29iv9AzLgLWjxVQnuHz5uZXSHSe6sh_moHAM9ncgXt7XglgTmp2Oy6uhFZdv8MyniIfA5o_ZggR6-Sr6A5FS6ZJcI49pyfPdq_o/s320/fire_bird_by_fhrankee-d32af8v.png" width="320" /></a></div>
Note: it should be at the exact location where your image has been added
(if the image is at the middle of the text, then the code should be found at the middle)
Step 6. Replace "separator" with "hidepic" - see the screenshot below:

If you need more help, please leave a comment below.
How to Remove Showing Posts With Label in Blogger

For any default Blogger layout, the "Showing posts with label" message shows up above the posts each time you click on a label link. As it's a pretty useless and annoying message, many people like to have it removed. If that is your wish, just follow the tutorial below:
Removing "Showing post with label...show all posts"
Step 1. Go to Dashboard - Template - Edit HTML (if necessary, click on Proceed button)

Step 2. Click anywhere inside the template code, then search - using CTRL+F - this code:
<b:includable id='status-message'>After you found it, click on the sideways arrow next to it, to expand the rest of the code.
Screenshot:

Step 3. Below is this code that you need to remove - along with the first one, as well:
<b:includable id='status-message'>
<b:if cond='data:navMessage'>
<div class='status-msg-wrap'>
<div class='status-msg-body'>
<data:navMessage/>
</div>
<div class='status-msg-border'>
<div class='status-msg-bg'>
<div class='status-msg-hidden'><data:navMessage/></div>
</div>
</div>
</div>
<div style='clear: both;'/>
</b:if>
</b:includable>
Screenshot

Step 4. Replace it with this one:
<b:includable id='status-message'>
<b:if cond='data:navMessage'>
<div>
</div>
<div style='clear: both;'/>
</b:if>
</b:includable>
Step 5. Save the template. Now view your blog and click on some label....there should be no box anymore.
Jumat, 04 Mei 2012
Recent Posts Widget with Thumbnails for Blogger/Blogspot
A few days ago, I posted a tutorial on How to Add a Simple Recent Posts Widget that shows a list with the most recent posts if you would prefer a more minimalist look. In this post, you will see a different way of displaying the Recent Posts on Blogger - this is specially for those who want to show more info like the recent posts excerpt / summary and the posts thumbnails.
To add this gadget is very easy, just follow these steps below:


Step 2. From the pop-up window, scroll down and choose HTML/JavaScript
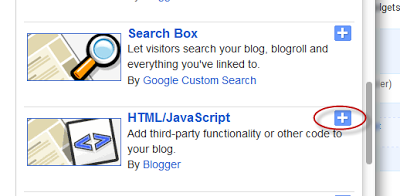
Step 3. Inside the empty box, add the following code:
- Replace YOUR-BLOG with the url of your site/blog (ex: http://helplogger.blogspot.com) and pay attention to have no forward slash symbol "/" at the end of the url
- To disable the scroll bar, remove the number 500
- By default, this widget is set to display a maximum of 8 recent posts. To change this number, replace the number 8 with the number of posts that you want to appear
- if you want only the posts titles, change true to none and "0" from padding-top:0px with 10
Step 4. Save your widget. And you're done!
To add this gadget is very easy, just follow these steps below:

How to Add the Recent Posts Widget to Blogger
Step 1. From your Blogger Dashboard, go to Layout > click on Add a Gadget link
Step 2. From the pop-up window, scroll down and choose HTML/JavaScript
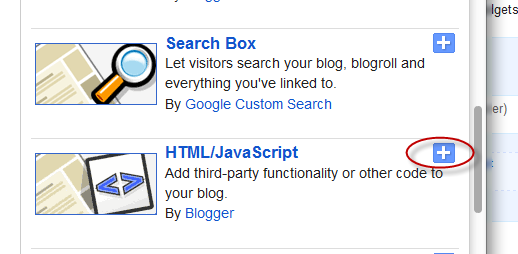
Step 3. Inside the empty box, add the following code:
<div class="eggTray">Note:
<script src="http://helplogger.googlecode.com/svn/trunk/listbadge.js">{"pipe_id":"1a6640e2a78b2c6e736f2220529daae5","_btype":"list",
"pipe_params":{"URL":"YOUR-BLOG/feeds/posts/default"},
"hideHeader":"false","height":"500","count": 8 }</script>
<noscript>Your browser does not support JavaScript!</noscript></div>
<style type=text/css>
.eggTray {margin:10px 0px;padding:0px;}
.ybr li {border-bottom:0px #cccccc dotted; padding:0px 0px 10px 0px!important;}
.pipesTitle {padding-top:0px;}
.pipesDescription {display:true;}
.ycdr, .ycdr a {color:#999999;}
.widget .popular-posts ul {padding-left:0;}
</style>
- Replace YOUR-BLOG with the url of your site/blog (ex: http://helplogger.blogspot.com) and pay attention to have no forward slash symbol "/" at the end of the url
- To disable the scroll bar, remove the number 500
- By default, this widget is set to display a maximum of 8 recent posts. To change this number, replace the number 8 with the number of posts that you want to appear
- if you want only the posts titles, change true to none and "0" from padding-top:0px with 10
Step 4. Save your widget. And you're done!


