Rabu, 18 September 2013

Rounded Corners and Shadows for Images using CSS

Here are some unique border styles that you can apply to blogger images by using the border-radius property and defining either all four corners simultaneously or applying the rounded border only to some of them.

One of the advantages of CSS3 is that we can apply rounded borders without complicating things too much and one of the options would be to use these edges or borders to images in the blog posts, to which we can also add some hover effects such as shading and rounded borders accompanied by transitions.

Note: if you need more info about how to add rounded corners on images, follow these links:
- CSS Basics. How to Apply Rounded Corners On Images #1
- CSS Basics. How to Apply Rounded Corners On Images #2

Below are a few examples of these borders and how the images behave when you hover over them.
If you want to use one of these styles, just copy the code below the image, then go to Template, click on the Edit HTML button and paste that code before ]]></b:skin> (CTRL + F to find it)

.post-body img {
border:0;
padding:0;
-moz-transition: all 1s;
-webkit-transition: all 1s;
-o-transition: all 1s;
}
.post-body img:hover {
box-shadow: 0px 0px 15px #000; /* Shadow */
border-radius: 50%; /* Rounded border */
-moz-transition: all 1s;
-webkit-transition: all 1s;
-o-transition: all 1s;
cursor:pointer;
}
.post-body img {
background:#FFF; /* background color around the image */
padding:15px; /* space between border and image */
-moz-transition: all 1s;
-webkit-transition: all 1s;
-o-transition: all 1s;
}
.post-body img:hover {
box-shadow: 0px 0px 15px #000; /* Shadow */
border-radius: 0% 50%; /* Rounded border */
-moz-transition: all 1s;
-webkit-transition: all 1s;
-o-transition: all 1s;
cursor:pointer;
}
.post-body img {
background:#FFF; /* the background color around the image */
padding:15px; /* The Space Between Border and Image */
border-radius: 50% 0; /* Rounded border */
box-shadow: 0px 0px 15px #000; /* Shadow */
-moz-transition: all 1s;
-webkit-transition: all 1s;
-o-transition: all 1s;
}
.post-body img:hover {
border-radius:0; /* This removes the border roundness (value 0) */
-moz-transition: all 1s;
-webkit-transition: all 1s;
-o-transition: all 1s;
cursor:pointer;
}
.post-body img {
box-shadow: 0px 0px 15px #000; /* Shadow */
border-radius: 50%; /* Rounded border */
border:0;
padding:0;
-moz-transition: all 1s;
-webkit-transition: all 1s;
-o-transition: all 1s;
}
.post-body img:hover {
box-shadow: 0; /* With this we remove the shadow (value 0) */
border-radius: 0; /* This removes the border roundness (value 0) */
-moz-transition: all 1s;
-webkit-transition: all 1s;
-o-transition: all 1s;
cursor:pointer;
}
.post-body img {
border-radius: 45% / 20%; /* Rounded border */
box-shadow: 0px 0px 15px #000; /* Shadow */
padding:0;
-moz-transition: all 1s;
-webkit-transition: all 1s;
-o-transition: all 1s;
}
.post-body img:hover {
border-radius: 0; /* This removes the roundness of border (value 0) */
-moz-transition: all 1s;
-webkit-transition: all 1s;
-o-transition: all 1s;
cursor:pointer;
}
So these effects will apply to all images uploaded to your Blogger posts. But if you want to apply them only on certain pictures then change .post-body img with .rounded  and .post-body img:hover with .rounded:hoverThen add the rounded class selector in the image's code:
<img class="rounded" src="Image URL"/>
These are just some examples, however, you can modify them anytime by adding or deleting more CSS styles, it depends on everybody's tastes or needs. But as you have seen, we can make the images look way more attractive and this has been done only with CSS ;)

Selasa, 17 September 2013

How to make the background image of the blog fill the entire screen

A constant question is how to make the background image of the blog always fill the entire screen regardless of the resolution of the monitor. And that is when we put a background image as measured by our monitor forgetting that there are actually monitors of all resolutions, very small and very large. So if we put an image according to our screen, there will be someone with a bigger monitor that surely will not see the whole picture or it will be repeated, and in this case, using very small monitors, the image will be seen incomplete.

blogger tricks, blogger tutorials, blogger blogspot

Here I will talk about two solutions for this, one is using CSS3, and another is using jQuery. With either of these two, we'll make the background image of the page to fill the entire screen regardless of the resolution of it.

CSS3


The first option is using CSS3, the advantage with this method is that we do not overload the blog with scripts, we use only the background-size property that is responsible for doing what we want.
The disadvantage is that this property is supported only by modern browsers, so in the case of Internet Explorer, it will only be seen for version 9 and above, in other browsers there shouldn't be any problem.
The method is very simple, just go to Template - Edit HTML, locate the background that is within body { and replace it with this:
background: url(Image URL) no-repeat center center fixed;
background-size: cover;
Note: to find the body { tag, click anywhere inside the code area then press the CTRL + F keys and paste it inside the search box. If you can't find it, remove the space between "body" and "{" then search again.

It would look something like this:
body {
background: url(URL of the image) no-repeat center center fixed;
background-size: cover;
margin:0;
}
Just put the URL of the image and that's it.

jQuery


With this method we will use jQuery with BackStretch plugin, the advantage is that it works in all browsers, including IE7 and above. And if you already use jQuery, you don't have to worry about the loading time of your blog, because the plugin is actually small.

To use this method in your blog, go to Template - Edit HTML and before </head> paste this script:
<script src='http://ajax.googleapis.com/ajax/libs/jquery/1.10.2/jquery.min.js' type='text/javascript'/>
<script type='text/javascript'>
//<![CDATA[
/*
* jQuery Backstretch
* Version 1.2.8
* http://srobbin.com/jquery-plugins/jquery-backstretch/
* Add a dynamically-resized background image to the page
* Copyright (c) 2012 Scott Robbin (srobbin.com)
* Licensed under the MIT license
* https://raw.github.com/srobbin/jquery-backstretch/master/LICENSE.txt
*/
;(function(a){a.backstretch=function(p,b,l){function s(){if(p){var b;0==c.length?c=a("<div />").attr("id","backstretch").css({left:0,top:0,position:m?"fixed":"absolute",overflow:"hidden",zIndex:-999999,margin:0,padding:0,height:"100%",width:"100%"}):c.find("img").addClass("deleteable");b=a("<img />").css({position:"absolute",display:"none",margin:0,padding:0,border:"none",zIndex:-999999,maxWidth:"none"}).bind("load",function(d){var b=a(this),e;b.css({width:"auto",height:"auto"});e=this.width||a(d.target).width();d=this.height||a(d.target).height();n=e/d;q();b.fadeIn(g.speed,function(){c.find(".deleteable").remove();"function"==typeof l&&l()})}).appendTo(c);0==a("body #backstretch").length&&(0===a(window).scrollTop()&&window.scrollTo(0,0),a("body").append(c));c.data("settings",g);b.attr("src",p);a(window).unbind("resize.backstretch").bind("resize.backstretch",function(){"onorientationchange"in window&&window.pageYOffset===0&&window.scrollTo(0,1);q()})}}function q(){try{j={left:0,top:0},rootWidth=h=o.width(),rootHeight=r?window.innerHeight:o.height(),f=h/n,f>=rootHeight?(k=(f-rootHeight)/2,g.centeredY&&(j.top="-"+k+"px")):(f=rootHeight,h=f*n,k=(h-rootWidth)/2,g.centeredX&&(j.left="-"+k+"px")),c.css({width:rootWidth,height:rootHeight}).find("img:not(.deleteable)").css({width:h,height:f}).css(j)}catch(a){}}var t={centeredX:!0,centeredY:!0,speed:0},c=a("#backstretch"),g=c.data("settings")||t;c.data("settings");var o,m,r,n,h,f,k,j;b&&"object"==typeof b&&a.extend(g,b);b&&"function"==typeof b&&(l=b);a(document).ready(function(){var b=window,d=navigator.userAgent,c=navigator.platform,e=d.match(/AppleWebKit\/([0-9]+)/),e=!!e&&e[1],f=d.match(/Fennec\/([0-9]+)/),f=!!f&&f[1],g=d.match(/Opera Mobi\/([0-9]+)/),h=!!g&&g[1],i=d.match(/MSIE ([0-9]+)/),i=!!i&&i[1];o=(m=!((-1<c.indexOf("iPhone")||-1<c.indexOf("iPad")||-1<c.indexOf("iPod"))&&e&&534>e||b.operamini&&"[object OperaMini]"==={}.toString.call(b.operamini)||g&&7458>h||-1<d.indexOf("Android")&&e&&533>e||f&&6>f||"palmGetResource"in window&&e&&534>e||-1<d.indexOf("MeeGo")&&-1<d.indexOf("NokiaBrowser/8.5.0")||i&&6>=i))?a(window):a(document);r=m&&window.innerHeight;s()});return this}})(jQuery);
//]]>
</script>
<script>
$.backstretch("URL of the image");
</script>

Put the URL of the image where indicated and ready.

As you can see both options are easy to apply, each with its pros and cons, but the result is the same, stretching the background image to fit the screen of any monitor regardless of the resolution of it.

Remember that in the case of jQuery method, you should verify that you are not using Mootools or Scriptaculous, and if you already have it, you will have to implement some changes in the script to make it compatible. And if you already use jQuery remember having only one version - the last one.

Vertical drop down menu with jQuery

jGlideMenu is a vertical menu that can be dragged and dropped so that the reader can place it anywhere, and in addition, he can browse through the tabs in a very peculiar manner that comes with a sliding effect giving a sexy touch.

One of the advantages is that it can store a large number of links and can be removed anytime if we want.

vertical menu, menu for blogger

To understand this menu better and to see it in action, visit this demo blog. There we can drag the menu, navigate through its tabs or close.

To add this vertical menu on your blog, just follow these steps:

1) From your Blogger dashboard, go to Template > Edit HTML and before the </head> tag, add these scripts:
<script src='http://ajax.googleapis.com/ajax/libs/jquery/1.7.1/jquery.min.js' type='text/javascript'/>
<script src='http://ajax.googleapis.com/ajax/libs/jqueryui/1.7.1/jquery-ui.min.js' type='text/javascript'/>
<script src='http://helplogger.googlecode.com/svn/trunk/jQuery.jGlideMenu.min.js' type='text/javascript'/>

<script type='text/javascript'>
//<![CDATA[
$(document).ready(function(){
$('#jGlide_001').jGlideMenu({
tileSource : '.jGlide_001_tiles' ,
demoMode : false
}).show();

$('#switch').click(function(){$(this).jGlideMenuToggle();});
});
//]]>
</script>
2) Now paste before ]]></b:skin> these styles:
.jGM_box {
position: absolute; /* Change absolute with fixed if you want it to float */
top: 50px; /* Distance from above */
right: 760px; /* Distance from right */
width: 227px;
height: 317px;
background: #fff; /* Background color */
margin: 0;
padding: 0;
border: 1px solid #ccc; /* Border */
overflow: hidden;
}
.jGM_header {
position: absolute;
top: 0;
left: 0;
height: 18px;
width: 227px;
background: #d1d1d1; /* Background color for the up bar */
color: #fff;
text-align: right;
vertical-align: middle;
line-height: 18px;
cursor: move;
}
.jGM_header a {
margin-right: 12px;
text-decoration: none;
color: #000 !important;
cursor: pointer;
}
.jGM_wrapper {
position: absolute;
top: 19px;
left: 0;
width: 2270px;
height: 288px;
margin: 0;
padding: 0;
border: 0;
}
.jGM_tile {
position: absolute;
top: 0;
left: 7px;
width: 213px;
height: auto;
overflow: hidden;
margin: 0;
padding: 0;
border: 0;
display: block;
}
.jGM_cats {
width: 100%;
height: 64px;
overflow: hidden;
vertical-align: middle;
text-align: left;
}
.jGM_cats h4 {
font-family: Verdana,Arial,serif;
font-size: 1.8em;
margin: 0;
padding: 2px 0;
line-height: 1.8em;
color: #414141;
font-weight: normal;
}
.jGM_cats p {
font-family: Verdana,tahoma,arial;
font-size: 1em; /* Font size of the description */
margin: 0;
padding: 0;
line-height: 1.2em;
color: #858585; /* Description color */
font-weight: normal;
}
.jGM_pager {
height: 18px;
width: 213px;
line-height: 18px;
margin: 0;
border: 0;
padding: 0;
background: #f6f6f6;
text-align: center;
vertical-align: middle;
}
.jGM_pager a {
text-decoration: none;
font-weight: bold;
text-decoration: none;
display: block;
}
.jGM_pager a:hover { background: #d1d1d1; }
.jGM_pager img { border: 0; margin: 6px 0; }
.jGM_content {
width: 213px;
height: 150px;
margin: 1px 0;
padding: 0;
border: 0;
overflow: hidden;
}
.jGM_content a {
font-family: Tahoma,arial;
text-decoration: none;
color: #333 !important;
height: 18px;
width: 100%;
display: block;
line-height: 18px;
padding: 0 0 0 10px;
background-color: #e6e7e9;
margin: 1px 0;
}
.jGM_content a:hover {
color: #fff !important;
background-color: #4D4E67; /* Bar color on mouseover */
}
.jGM_more {
background-image: url(https://blogger.googleusercontent.com/img/b/R29vZ2xl/AVvXsEh-2YRipI1bvoDf7gtwNpbhNptGwJ6p9iWk2-UfWlKolurTfjtRk2Xwvl29m-ydvbzyK2yUWd6ePHWGqbsnDSQlEFKQax60saPd57D50yBtaO2Ceut5KjJAaozrNhou63N9ifw0zDnMME4/s1600/arrow.gif);
background-repeat: no-repeat;
background-position: 203px 50%;
}
.jGM_back {
position: absolute;
top: 255px;
right: 0;
height: 18px;
width: 52px;
background: #d1d1d1;
line-height: 18px;
vertical-align: middle;
text-align: center;
margin: 10px 0 0 0;
padding: 0;
border: 0;
z-index: 99;
}
.jGM_back a {
height: 100%;
width: 100%;
text-decoration: none;
color: #000 !important; /* Color of the "Back" link */
display: block;
}
.jGM_back a:hover {
color: #fff !important; /* Color of the "Back" link on mouseover */
background: #4D4E67;
}
.jGM_reset {
position: absolute;
top: 255px;
right: 62px;
height: 18px;
width: 52px;
background: #d1d1d1;
line-height: 18px;
vertical-align: middle;
text-align: center;
margin: 10px 0 0 0;
padding: 0;
border: 0;
z-index: 99;
}
.jGM_reset a {
height: 100%;
width: 100%;
text-decoration: none;
color: #000 !important; /* Color of the "Home" link */
display: block;
}
.jGM_reset a:hover {
color: #fff !important; /* Color of the "Home" link on mouseover */
background: #4D4E67;
}
3) Now go to Layout and paste the structure of the menu inside a HTML/Javascript gadget:
<div class="jGM_box" id="jGlide_001">

<!-- Here all the links of the first level -->
<ul id="tile_001" class="jGlide_001_tiles" title="Menu" alt="Description of the first level">
<li rel="tile_002">Link 1</li>
<li rel="tile_003">Link 2</li>
<li rel="tile_004">Link 3</li>
<li rel="tile_006">Link 4</li>
<li rel="tile_007">Link 5</li>
<li><a href="URL address">Link 6</a></li>
<li><a href="URL address">Link 7</a></li>
<li><a href="URL address">Link 8</a></li>
<li><a href="URL address">Link 9</a></li>
<li><a href="URL address">Link 10</a></li>
<li><a href="URL address">Link 11</a></li>
</ul>

<!-- Here all the links of the second level -->
<ul id="tile_002" class="jGlide_001_tiles" title="Menu" alt="Description of the second level">
<li rel="tile_005">Link 1.1</li>
<li><a href="URL address">Link 1.2</a></li>
<li><a href="URL address">Link 1.3</a></li>
<li><a href="URL address">Link 1.4</a></li>
</ul>

<ul id="tile_003" class="jGlide_001_tiles" title="Menu" alt="Description of the second level">
<li><a href="URL address">Link 2.1</a></li>
<li rel="tile_008">Link 2.2</li>
<li><a href="URL address">Link 2.3</a></li>
</ul>

<ul id="tile_004" class="jGlide_001_tiles" title="Menu" alt="Description of the second level">
<li><a href="URL address">Link 3.1</a></li>
<li><a href="URL address">Link 3.2</a></li>
<li><a href="URL address">Link 3.3</a></li>
</ul>


<ul id="tile_006" class="jGlide_001_tiles" title="Menu" alt="Description of the second level">
<li><a href="URL address">Link 4.1</a></li>
<li><a href="URL address">Link 4.2</a></li>
<li><a href="URL address">Link 4.3</a></li>
</ul>

<ul id="tile_007" class="jGlide_001_tiles" title="Menu" alt="Description of the second level">
<li><a href="URL address">Link 5.1</a></li>
<li><a href="URL address">Link 5.2</a></li>
</ul>


<!-- Here all the links of the third level -->
<ul id="tile_005" class="jGlide_001_tiles" title="Menu" alt="Description of the third level">
<li><a href="URL address">Link 1.1.1</a></li>
<li><a href="URL address">Link 1.1.2</a></li>
</ul>


<ul id="tile_008" class="jGlide_001_tiles" title="Menu" alt="Description of the third level">
<li><a href="URL address">Link 1.2.1</a></li>
<li><a href="URL address">Link 1.2.2</a></li>
</ul>

</div>
Add the URLs of the links and the names of the tabs and that's it.
If you want to add more links to the first level, then add another line like this:
<li><a href="URL address">Link 12</a></li>
If you want to add another level to the link, then the line should be like this:
<li rel="tile_0010">Link 5</li>
Then in the area of ​​the second or third level, add a piece like this:
<ul id="tile_0010" class="jGlide_001_tiles" title="Menu" alt="Description of the second level">
<li><a href="URL address">Link 5.1</a></li>
<li><a href="Url address">Link 5.2</a></li>
</ul>
Here you should keep something in mind, if you look closely the link takes the REL attribute which must be the same as the ID we put on the second level, these IDs should not repeat and always be unique.
Yes, it sounds complicated, but once you understand the concept, you'll see that is actually pretty simple.
In the area of ​​the styles, there are the parts that can be customized. If you want the menu to be static, let's say you want to add it in the sidebar, then delete the first code of the script that is in italics. And in the CSS styles, remove this part:
position: absolute; /* Change absolute with fixed if you want it to float */
top: 50px; /* Distance above */
right: 760px; /* Distance to the right */
When there are many links then, there will be showing some arrows, so when you mouseover them, it will show the rest of the links either up or down.

Throughout the menu structure we can change the Menu name and the descriptions as well.

As this menu is made with JQuery, it is recommended to verify to have only one version of it.

How to embed a youtube playlist on your blogger blog

In this tutorial you will see how to create a YouTube video gallery using jQuery and add the Youtube playlist to your Blogger blog. Inside this gallery/playlist, you can add your favorite youtube videos or any video that you want to share with your visitors. Because of its default dimensions (width of 765px), it is recommended to add it just below the blog header, however, you can edit CSS code to fit anywhere you want to add it.

youtube playlist for blogger


To add this video slider/youtube playlist to your blog, please follow these steps below:

Step 1. From your blogger dashboard, go to Template > Edit HTML and click anywhere inside the code area to open the Blogger search box by pressing the CTRL + F keys.


Step 2. Type or paste the </head> tag inside the search box and hit Enter to find it.
Just above this tag, add the following scripts:

<script src='http://ajax.googleapis.com/ajax/libs/jquery/1.8.2/jquery.min.js' type='text/javascript'/>
<script>
//<![CDATA[
/*hoverscroll v.0.2.4*/
(function($) {
$.fn.hoverscroll = function(params) {
if (!params) { params = {}; }
params = $.extend({}, $.fn.hoverscroll.params, params);
this.each(function() {
var $this = $(this);
if (params.debug) {$.log('[HoverScroll] Trying to create hoverscroll on element ' + this.tagName + '#' + this.id);}
if (params.fixedArrows) {
$this.wrap('<div class="fixed-listcontainer"></div>')
}
else {
$this.wrap('<div class="listcontainer"></div>');
}

$this.addClass('list');
var listctnr = $this.parent();
listctnr.wrap('<div class="ui-widget-content hoverscroll' +
(params.rtl && !params.vertical ? " rtl" : "") + '"></div>');
//listctnr.wrap('<div class="hoverscroll"></div>');

var ctnr = listctnr.parent();

var leftArrow, rightArrow, topArrow, bottomArrow;
if (params.arrows) {
if (!params.vertical) {
if (params.fixedArrows) {
leftArrow = '<div class="fixed-arrow left"></div>';
rightArrow = '<div class="fixed-arrow right"></div>';

listctnr.before(leftArrow).after(rightArrow);
}
else {
leftArrow = '<div class="arrow left"></div>';
rightArrow = '<div class="arrow right"></div>';

listctnr.append(leftArrow).append(rightArrow);
}
}
else {
if (params.fixedArrows) {
topArrow = '<div class="fixed-arrow top"></div>';
bottomArrow = '<div class="fixed-arrow bottom"></div>';

listctnr.before(topArrow).after(bottomArrow);
}
else {
topArrow = '<div class="arrow top"></div>';
bottomArrow = '<div class="arrow bottom"></div>';

listctnr.append(topArrow).append(bottomArrow);
}
}
}
ctnr.width(params.width).height(params.height);

if (params.arrows && params.fixedArrows) {
if (params.vertical) {
topArrow = listctnr.prev();
bottomArrow = listctnr.next();

listctnr.width(params.width)
.height(params.height - (topArrow.height() + bottomArrow.height()));
}
else {
leftArrow = listctnr.prev();
rightArrow = listctnr.next();

listctnr.height(params.height)
.width(params.width - (leftArrow.width() + rightArrow.width()));
}
}
else {
listctnr.width(params.width).height(params.height);
}

var size = 0;

if (!params.vertical) {
ctnr.addClass('horizontal');
$this.children().each(function() {
$(this).addClass('item');

if ($(this).outerWidth) {
size += $(this).outerWidth(true);
}
else {
size += $(this).width() + parseInt($(this).css('padding-left')) + parseInt($(this).css('padding-right'))
+ parseInt($(this).css('margin-left')) + parseInt($(this).css('margin-right'));
}
});
$this.width(size);

if (params.debug) {
$.log('[HoverScroll] Computed content width : ' + size + 'px');
}
if (ctnr.outerWidth) {
size = ctnr.outerWidth();
}
else {
size = ctnr.width() + parseInt(ctnr.css('padding-left')) + parseInt(ctnr.css('padding-right'))
+ parseInt(ctnr.css('margin-left')) + parseInt(ctnr.css('margin-right'));
}

if (params.debug) {
$.log('[HoverScroll] Computed container width : ' + size + 'px');
}
}
else {
ctnr.addClass('vertical');
$this.children().each(function() {
$(this).addClass('item')

if ($(this).outerHeight) {
size += $(this).outerHeight(true);
}
else {
size += $(this).height() + parseInt($(this).css('padding-top')) + parseInt($(this).css('padding-bottom'))
+ parseInt($(this).css('margin-bottom')) + parseInt($(this).css('margin-bottom'));
}
});
$this.height(size);

if (params.debug) {
$.log('[HoverScroll] Computed content height : ' + size + 'px');
}
if (ctnr.outerHeight) {
size = ctnr.outerHeight();
}
else {
size = ctnr.height() + parseInt(ctnr.css('padding-top')) + parseInt(ctnr.css('padding-bottom'))
+ parseInt(ctnr.css('margin-top')) + parseInt(ctnr.css('margin-bottom'));
}

if (params.debug) {
$.log('[HoverScroll] Computed container height : ' + size + 'px');
}
}
var zone = {
1: {action: 'move', from: 0, to: 0.06 * size, direction: -1 , speed: 16},
2: {action: 'move', from: 0.06 * size, to: 0.15 * size, direction: -1 , speed: 8},
3: {action: 'move', from: 0.15 * size, to: 0.25 * size, direction: -1 , speed: 4},
4: {action: 'move', from: 0.25 * size, to: 0.4 * size, direction: -1 , speed: 2},
5: {action: 'stop', from: 0.4 * size, to: 0.6 * size},
6: {action: 'move', from: 0.6 * size, to: 0.75 * size, direction: 1 , speed: 2},
7: {action: 'move', from: 0.75 * size, to: 0.85 * size, direction: 1 , speed: 4},
8: {action: 'move', from: 0.85 * size, to: 0.94 * size, direction: 1 , speed: 8},
9: {action: 'move', from: 0.94 * size, to: size, direction: 1 , speed: 16}
}

ctnr[0].isChanging = false;
ctnr[0].direction = 0;
ctnr[0].speed = 1;
function checkMouse(x, y) {
x = x - ctnr.offset().left;
y = y - ctnr.offset().top;

var pos;
if (!params.vertical) {pos = x;}
else {pos = y;}

for (i in zone) {
if (pos >= zone[i].from && pos < zone[i].to) {
if (zone[i].action == 'move') {startMoving(zone[i].direction, zone[i].speed);}
else {stopMoving();}
}
}
}

function setArrowOpacity() {
if (!params.arrows || params.fixedArrows) {return;}

var maxScroll;
var scroll;

if (!params.vertical) {
maxScroll = listctnr[0].scrollWidth - listctnr.width();
scroll = listctnr[0].scrollLeft;
}
else {
maxScroll = listctnr[0].scrollHeight - listctnr.height();
scroll = listctnr[0].scrollTop;
}
var limit = params.arrowsOpacity;
var opacity = (scroll / maxScroll) * limit;

if (opacity > limit) { opacity = limit; }
if (isNaN(opacity)) { opacity = 0; }

var done = false;
if (opacity <= 0) {
$('div.arrow.left, div.arrow.top', ctnr).hide();
if(maxScroll > 0) {
$('div.arrow.right, div.arrow.bottom', ctnr).show().css('opacity', limit);
}
done = true;
}
if (opacity >= limit || maxScroll <= 0) {
$('div.arrow.right, div.arrow.bottom', ctnr).hide();
done = true;
}

if (!done) {
$('div.arrow.left, div.arrow.top', ctnr).show().css('opacity', opacity);
$('div.arrow.right, div.arrow.bottom', ctnr).show().css('opacity', (limit - opacity));
}
}

function startMoving(direction, speed) {
if (ctnr[0].direction != direction) {
if (params.debug) {
$.log('[HoverScroll] Starting to move. direction: ' + direction + ', speed: ' + speed);
}

stopMoving();
ctnr[0].direction = direction;
ctnr[0].isChanging = true;
move();
}
if (ctnr[0].speed != speed) {
if (params.debug) {
$.log('[HoverScroll] Changed speed: ' + speed);
}

ctnr[0].speed = speed;
}
}

function stopMoving() {
if (ctnr[0].isChanging) {
if (params.debug) {
$.log('[HoverScroll] Stoped moving');
}

ctnr[0].isChanging = false;
ctnr[0].direction = 0;
ctnr[0].speed = 1;
clearTimeout(ctnr[0].timer);
}
}

function move() {
if (ctnr[0].isChanging == false) {return;}

setArrowOpacity();

var scrollSide;
if (!params.vertical) {scrollSide = 'scrollLeft';}
else {scrollSide = 'scrollTop';}

listctnr[0][scrollSide] += ctnr[0].direction * ctnr[0].speed;
ctnr[0].timer = setTimeout(function() {move();}, 50);
}

if (params.rtl && !params.vertical) {
listctnr[0].scrollLeft = listctnr[0].scrollWidth - listctnr.width();
}

ctnr
.mousemove(function(e) {checkMouse(e.pageX, e.pageY);})
.bind('mouseleave', function() {stopMoving();});

this.startMoving = startMoving;
this.stopMoving = stopMoving;

if (params.arrows && !params.fixedArrows) {
// Initialise arrow opacity
setArrowOpacity();
}
else {
// Hide arrows
$('.arrowleft, .arrowright, .arrowtop, .arrowbottom', ctnr).hide();
}
});

return this;
};

if (!$.fn.offset) {
$.fn.offset = function() {
this.left = this.top = 0;

if (this[0] && this[0].offsetParent) {
var obj = this[0];
do {
this.left += obj.offsetLeft;
this.top += obj.offsetTop;
} while (obj = obj.offsetParent);
}

return this;
}
}

$.fn.hoverscroll.params = {
vertical: false,
width: 400,
height: 50,
arrows: true,
arrowsOpacity: 0.7,
fixedArrows: false,
rtl: false,
debug: false
};
$.log = function() {
try {console.log.apply(console, arguments);}
catch (e) {
try {opera.postError.apply(opera, arguments);}
catch (e) {}
}
};
})(jQuery);

$(function(){
$("#videoslider-tabs a").click(function(){
var container = $("#videoslider-content");
container.html("<img src='https://blogger.googleusercontent.com/img/b/R29vZ2xl/AVvXsEhG5mNIrn0duaWcsxkI7eyqNF48Ash0ozyEMGutiOEaK-asizNzQ3alU_3FxycxpNB6a2qU45qkVQHDf3_-dr4oq4KxZMiVQRE-RfzBYZr9Ezo1AV5d-h6t2X5hXEzPnk53kMikGehrsu1V/s1600/loading.png' class='loading-vid' />");
var id = $(this).attr("href").slice(1);
loadvideo(id);
return false;
});
$("#videoslider-tabs").hoverscroll({vertical:true,width:300,height:330,arrows:false});
$("#videoslider-tabs li").hover(function(){$(this).addClass("hover");},function(){$(this).removeClass("hover");});
loadvideo();
});

function loadvideo (hash){if(hash){hash = hash.slice(3);$("#videoslider-content").html(video[hash]);$("#videoslider-tabs li").removeClass("actVid");$("#videoslider-tabs a[href=#vid"+hash+"]").parent().addClass("actVid");}else{$("#videoslider-content").html(video[1]);$("#videoslider-tabs li").removeClass("actVid");$("#videoslider-tabs a[href=#vid1]").parent().addClass("actVid");}}
//]]>
</script>

Step 3. Now let's add the CSS code. Just above the same </head> tag, add this code:
<style>
#videoslider {
background:#F6F6F6; /* Background color */
clear:both;
margin:0 auto;
padding:5px;
width:735px;
border-radius: 5px;
border: 1px solid #C1C1C1;
-moz-background-clip: padding;
-webkit-background-clip: padding-box;
background-clip: padding-box;
}
#videoslider, #videoslider-content, #videoslider-tabs {
height:340px;
}
#videoslider-content {
color:#fff;
float:left;
text-align:center;
width:430px;
z-index:1;
}
.loading-vid {
display:block;
margin:165px auto 0;
}
#videoslider-tabs {
float:right;
width:240px;
margin:0;
}
#videoslider-tabs li {
background-color:#F6F6F6;
border: 1px solid #C1C1C1;
float:left;
height:60px;
padding:5px;
width:240px;
list-style:none;
overflow: hidden;
}
#videoslider-tabs li a {
padding:0 !important;
border:0 !important;
}
#videoslider-tabs li.hover {
background-color:#EBEBEB;
}
#videoslider-tabs li.actVid {
background:#555;
}
#videoslider-tabs li img.thumb-vid {
background-color:#EEEEEE;
float:left;
height:52px;
margin:0 8px 0 0;
padding:5px;
width:52px;
}
#videoslider-tabs li span.vidTit {
display:block;
color:#128EC9; /* Titles color */
font-size:12px; /* Titles font size */
font-weight:bold;
text-decoration:none;
}
#videoslider-tabs li .vidDesc {
display:block;
color:#222222; /* Color of the description */
font-size:11px; /* Font size of the description */
font-weight:bold;
text-decoration:none;
}
#videoslider-tabs a {
text-decoration:none;
}
#videoslider-tabs li.actVid .vidDesc {
color:#fff;
}
#videoslider-tabs li span.vidTit .actVid {
color:#fff; /* Titles color */
}
.ui-widget-content{
float:right;
overflow-y: scroll;
overflow-x: hidden;
}
.tabs-outer {
background-image: none !important;
}
#videoslider-tabs li a:hover {
background: none !important;
}</style>
Step 4. Click on the Save Template button

To make this youtube playlist work we need to add the HTML structure of it:

Step 5. Go to Layout or Pages or anywhere you want to add it and add the following code inside the HTML area (if you want to add it as a widget, paste the code inside a HTML/Javascript gadget by clicking on Add a gadget link within the Layout/Page Elements section):
<script>
var video = [];
video[1] = '<iframe width="460" height="345" src="http://www.youtube.com/embed/video_ID_1" frameborder="0" allowfullscreen></iframe>';
video[2] = '<iframe width="460" height="345" src="http://www.youtube.com/embed/video_ID_2" frameborder="0" allowfullscreen></iframe>';
video[3] = '<iframe width="460" height="345" src="http://www.youtube.com/embed/video_ID_3" frameborder="0" allowfullscreen></iframe>';
video[4] = '<iframe width="460" height="345" src="http://www.youtube.com/embed/video_ID_4" frameborder="0" allowfullscreen></iframe>';
video[5] = '<iframe width="460" height="345" src="http://www.youtube.com/embed/video_ID_5" frameborder="0" allowfullscreen></iframe>';
</script>
<div id="videoslider">
<div id="videoslider-content"></div>
<ul id="videoslider-tabs">
<li><a href="#vid1"><img src="//i2.ytimg.com/vi/video_ID_1/default.jpg" class="thumb-vid" /><span class="vidTit">Video Name</span><span class="vidDesc">Video Description</span></a></li>

<li><a href="#vid2"><img src="//i2.ytimg.com/vi/video_ID_2/default.jpg" class="thumb-vid" /><span class="vidTit">Video Name</span><span class="vidDesc">Video Description</span></a></li>

<li><a href="#vid3"><img src="//i2.ytimg.com/vi/video_ID_3/default.jpg" class="thumb-vid" /><span class="vidTit">Video Name</span><span class="vidDesc">Video Description</span></a></li>

<li><a href="#vid4"><img src="//i2.ytimg.com/vi/video_ID_4/default.jpg" class="thumb-vid" /><span class="vidTit">Video Name</span><span class="vidDesc">Video Description</span></a></li>

<li><a href="#vid5"><img src="//i2.ytimg.com/vi/video_ID_5/default.jpg" class="thumb-vid" /><span class="vidTit">Video Name</span><span class="vidDesc">Video Description</span></a></li>
</ul>
</div>

Add the IDs of your videos to where it says video_ID_..., titles (Video Name) and a brief description (Description). To get the ID of a video, open the video on YouTube and look at the address bar - you need only the last characters after "v="


Note that each video ID should be added two times, the ones in red are for the video and the ones in orange are for the tabs thumbnail.

To add more videos, add two lines like the ones in bold above and then change the video[] and #vid... number. If you decided to add it inside a post or page, please make sure that you don't switch back to the Compose tab and publish your post while you're still on the HTML tab, otherwise the #vid location will be replaced with some other odd Blogger URLs.

JPMorgan heeft al miljard besteedt aan regels

JPMorgan heeft al miljard besteedt aan regels

Bewerkt door: Redactie
17-9-13 - 16:28  bron: ANP

Een voorbijganger passeert het hoofdkantoor van JPMorgan Chase in New York. © reuters.
 
JPMorgan Chase heeft dit jaar al een miljard dollar besteed aan interne controles en veranderingen om aan alle mededingings- en bancaire regels te voldoen. Dat zei topman Jamie Dimon van de Amerikaanse bank.

Kamis, 12 September 2013

Can encryption still be safe?

Can encryption still be safe?


Security

by Ben Sullivan| 09 September 2013

In light of the most recent Snowden revelations, experts weigh in on how security companies can capitalise on NSA snooping
Two sides have emerged from the NSA/GCHQ encryption hacking story. One that is convinced we are in an Orwellian-inducing end of times and we should all just stop using the Internet now, and one which says that this has obviously been happening all along, and now's a good time, more than there ever has been, for companies to improve their security and boast what would surely be great-selling software: NSA-proof encryption.
On the latter side, security experts are touting what Snowden has said all along:
"Encryption works. Properly implemented strong crypto systems are one of the few things that you can rely on."
"Actually, I see Snowden's encryption revelations as a positive for the crypto community because it gives experts an opportunity to address some misconceptions surrounding the technology. Chiefly, there's a big difference between asymmetric and symmetric encryption," says Paige Leidig, SVP at CipherCloud.
"Most of the Internet is based on asymmetric RSA encryption which is public key cryptography that requires two separate keys one of which is secret (or private) and one of which is public, but both are mathematically linked. Public key is for encrypting the data and the private key is for decrypting the data. Most of Internet encryption e.g. HTTPS and email, are based on asymmetric encryption.
"On the other hand, symmetric encryption is based on single key which is useful when you want to keep information within a single system and not sharing with external parties e.g. Storage, Backup, and Databases. Advanced Encryption Standard (AES) is the most advanced symmetric encryption."
But what about the NSA's tailored access programs? These attacks have a number of exploits that can be used against your computer - whether you're running Windows, Mac OS, Linux, iOS, or something else - and a variety of tricks to get them on to your device. Your anti-virus software won't detect them, even if you knew where to look, it'd be a tough job to find them.
What Leidig says about symmetric encryption, though, is that any surveillance would have to go through the customer first since they retain the key. Yes, they'll be forced to turn it over, but at least the customer is then aware of any such access. So could we be looking at a boom for companies flaunting symmetric encryption storage?
The sentiment of a business opportunity is also echoed in other comments.
Naeem Zafar, chief executive at mobile security startup, Bitzer Mobile, says a ripple effect may be about to spur innovation.
"This is a wake up call that old security and encryption standards are outdated," says Zafar. "We need a new encryption standard. We can no longer sit on our laurels . Security is a changing game and we must come up with new strategies. The ball is in the entrepreneur's court."
Chris Petersen, chief technology officer at security analytics company LogRhythm, says: "What this will really do is put our adversaries on notice that they need to invest in stronger encryption."
Security technologist Bruce Schneier commented in the Guardian that "the NSA has turned the fabric of the internet into a vast surveillance platform, but they are not magical. They're limited by the same economic realities as the rest of us, and our best defense is to make surveillance of us as expensive as possible."
If symmetric encryption is used, NSA has to turn from mass traffic surveillance to these tailored attacks, which cost money and time.
One problem with using this software though, is that how do you know it hasn't already been compromised by the NSA. It's pretty obvious that most encryption products from large US companies have NSA-friendly back doors, and many international ones probably do as well. How do we separate them from the ones who haven't associated with NSA/GCHQ? Furthermore, traget-rich environments are being created by users who want their data securlely encrypted. I presume these areas would be targeted first and foremost by the government for monitoring suspicious activity.
However, other security experts are claiming that we really have nothing to worry about, and that it's better for governments to be able to spy on data, as there's far worse people out there with actual malicious intent.
"The people who work on PRISM are working to protect us," says Tom Kellermann, Trend Micro's vice president of cybersecurity.
"They don't care what movie you're going to or whether someone is cheating on his wife."
Phil Lieberman, president of security firm Lieberman Software says: "I wish the NSA had a monopoly on these techniques. Consumers should be more worried about the criminals of the world who have similar capabilities. The criminals are certainly not using these capabilities in a narrow way, and they're not going through any approval process."
Pravin Kothari, chief executive at encryption company CipherCloud, agrees:
"The average consumer has more to lose from malicious hackers and spammers out to score a quick buck than from government technologists," says Kothari. "The government is focused on hunting down would-be terrorists and criminals who are intending to disrupt the general welfare."
But are they missing the point? Surely it would be better to have nobody having access to your data, data that was promised to be private by companies that we all had trust in.
Bruce Schneier, writing on the Guardian, gives us five points of advice:
"1) Hide in the network. Implement hidden services. Use Tor to anonymize yourself. Yes, the NSA targets Tor users, but it's work for them. The less obvious you are, the safer you are.
2) Encrypt your communications. Use TLS. Use IPsec. Again, while it's true that the NSA targets encrypted connections - and it may have explicit exploits against these protocols - you're much better protected than if you communicate in the clear.
3) Assume that while your computer can be compromised, it would take work and risk on the part of the NSA - so it probably isn't. If you have something really important, use an air gap. Since I started working with the Snowden documents, I bought a new computer that has never been connected to the internet. If I want to transfer a file, I encrypt the file on the secure computer and walk it over to my internet computer, using a USB stick. To decrypt something, I reverse the process. This might not be bulletproof, but it's pretty good.
4) Be suspicious of commercial encryption software, especially from large vendors. My guess is that most encryption products from large US companies have NSA-friendly back doors, and many foreign ones probably do as well. It's prudent to assume that foreign products also have foreign-installed backdoors. Closed-source software is easier for the NSA to backdoor than open-source software. Systems relying on master secrets are vulnerable to the NSA, through either legal or more clandestine means.
5) Try to use public-domain encryption that has to be compatible with other implementations. For example, it's harder for the NSA to backdoor TLS than BitLocker, because any vendor's TLS has to be compatible with every other vendor's TLS, while BitLocker only has to be compatible with itself, giving the NSA a lot more freedom to make changes. And because BitLocker is proprietary, it's far less likely those changes will be discovered. Prefer symmetric cryptography over public-key cryptography. Prefer conventional discrete-log-based systems over elliptic-curve systems; the latter have constants that the NSA influences when they can."
Schneier concludes by saying:
"Trust the math. Encryption is your friend. Use it well, and do your best to ensure that nothing can compromise it. That's how you can remain secure even in the face of the NSA."

http://www.cbronline.com/news/security/can-encryption-still-be-safe?goback=%2Egde_38412_member_272957563#%21

Rabu, 11 September 2013

Cybercrime-as-a-Service, the rise of hacking services


August 19th, 2013
Digital_Underground1


Security expert Dancho Danchev profiled one of the numerous hacking services offered in the underground highlighting new trends in the cybercrime ecosystem.

With the term attack-as-a-service model is indicated the practice to outsource all the phases of an attack to specialists instead to rent tools and architecture to conduct personally the illegal activities (Malware-as-a-Service). Danchev has recently profiled a newly launched underground service that could allow for cybercriminals to automate the penetration testing process against any target. The providers of the hacking service sustain that using their own exploitation techniques are practically able to compromise any website.
As usual the authors of this service provide an excellent marketing model, they propose a demo for the attack useful to penetrate several vulnerable websites.
The model on sale for service is very attractive, hackers analyze in a first phase the target for a very cheap price (5$) and only in the presence of vulnerabilities they hack it for a price nearly 50$, of course for large architectures to attack the prices soar from $1000 to 50000.
This type of hacking services is an example of unethically pen-testing activity, the criminals seem to not use any automated tool neither Google services to discover vulnerabilities, another singularity is that they do not operate against website and service of their country, a habit already seen in the sale of Kins and Zeus malware.
Following the key features proposed by Danchev in his post:
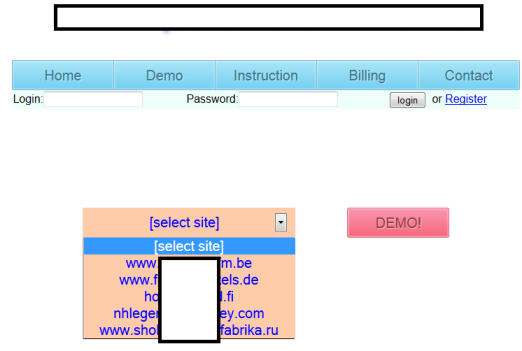
  • the service offers a demo of the hacking process for several (vulnerable) Web sites
  • the price for scanning a single Web site is $5, and if a scanned Web site can be hacked using the service, the price becomes $50
  • the instructions of the service state that – “We don’t touch our (country’s) Web sites, and our law enforcement doesn’t touch us”
  • the service doesn’t utilize Google for finding vulnerable Web sites on a mass scale, instead it allows the cybercriminal to manually enter the Web site about to get unethically pen-tested
  • even if the service cannot automatically hack into the Web site (based on what the service claims are private techniques for exploitation) the specially displayed output is supposed to increase the probability for a successful compromise
  • the service also offers consultation for hacking into any given Web site, with the prices varying between $1000 to $50,000
  • the service successfully detects Microsoft SQL Server, Oracle, MS Access
Following an image of the profiles hacking service:
hacking services underground
At the moment the impact of the specific service is limited due its actual inability cause widespread damage but the availability of a huge quantity of tools and hacking services represents an alarming reality that is causing a sensible increase in blended, automated attacks.
Recently FireHost Secure cloud hosting company issued Q2 2013 Superfecta report that revealed the concerning growth for automated attacks against web applications.
The same Danchev already profiled other DIY tools such as Google Dorks Web site exploitation tools, brute forcing applications and stealth Apache module for backdoor distribution, the greater the number of these tools on the market and the greater the number of cyber criminals who provide for the complete outsourcing of attacks.
According last McAfee report “Cybercrime-as-a-Service” security experts observed a sensible increase for attack-as-a-service proposal, the study profiled as example Password cracking services and Denial-of-services.
hacking services DDoS
“If the budget allows, a budding cybercriminal can skip the process of conducting research, building appropriate tools, and developing an infrastructure to launch a cyberattack by choosing a service that will outsource the entire process.” the report states.
No doubts that hacking services will catch in the medium term a good portion of the offer for cybercriminals on the underground.
Pierluigi Paganini
(Security Affairs – cybercrime, hacking services)

 
Design by Free WordPress Themes | Bloggerized by Lasantha - Premium Blogger Themes | Best Web Hosting